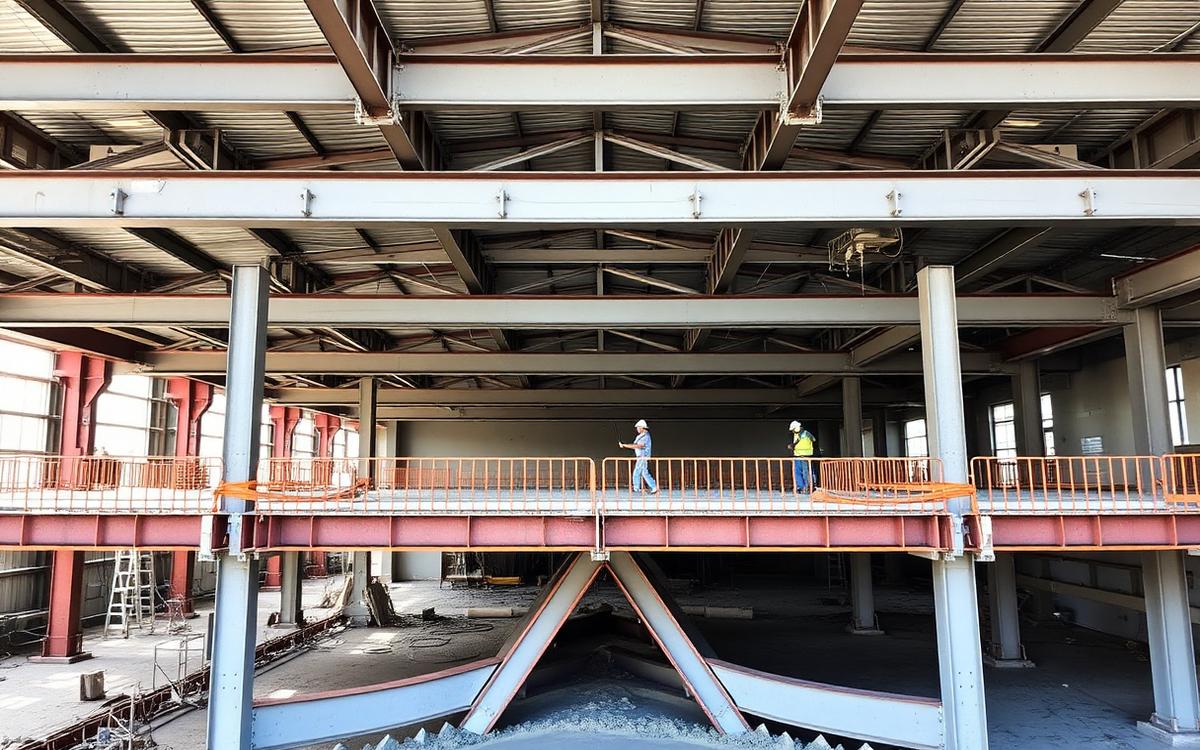
Two non-collapse limit states that still ruin a structure: <strong>serviceability</strong> (a strong floor bounces, brittle cladding cracks, a moment frame drifts and jams elevators) and <strong>fatigue</strong> (repeated cyclic loading cracks a member at stresses far below F<sub>y</sub>, with little warning). Both are checked with unfactored service loads and both hinge on <em>detail geometry</em>, not just member size — which is why they cause the majority of steel retrofits worldwide.
Every floor beam and every high-rise building for serviceability. Fatigue governs the design of <strong>crane runways, highway and railway bridges, communication towers, and support structures for reciprocating machinery</strong>. Historical drivers: Silver Bridge collapse (WV, 1967 — eyebar fatigue, 46 dead), Yellow Mill Pond bridge cracks (I-95, 1970s — cover-plate ends), Hoan Bridge web fracture (Milwaukee, 2000). Feeds the capstone drift/vibration checks and any bridge-design elective.
Chapter focus. Two limit states that don't cause collapse but still ruin a building: (1) serviceability — the floor bounces, the cladding cracks, the elevator jams — and (2) fatigue — under repeated cyclic loading, a member fails at a stress far below Fy. Both are checked with unfactored (service) loads, both are governed by detail geometry, and both are the number-one reason existing steel structures need retrofits.
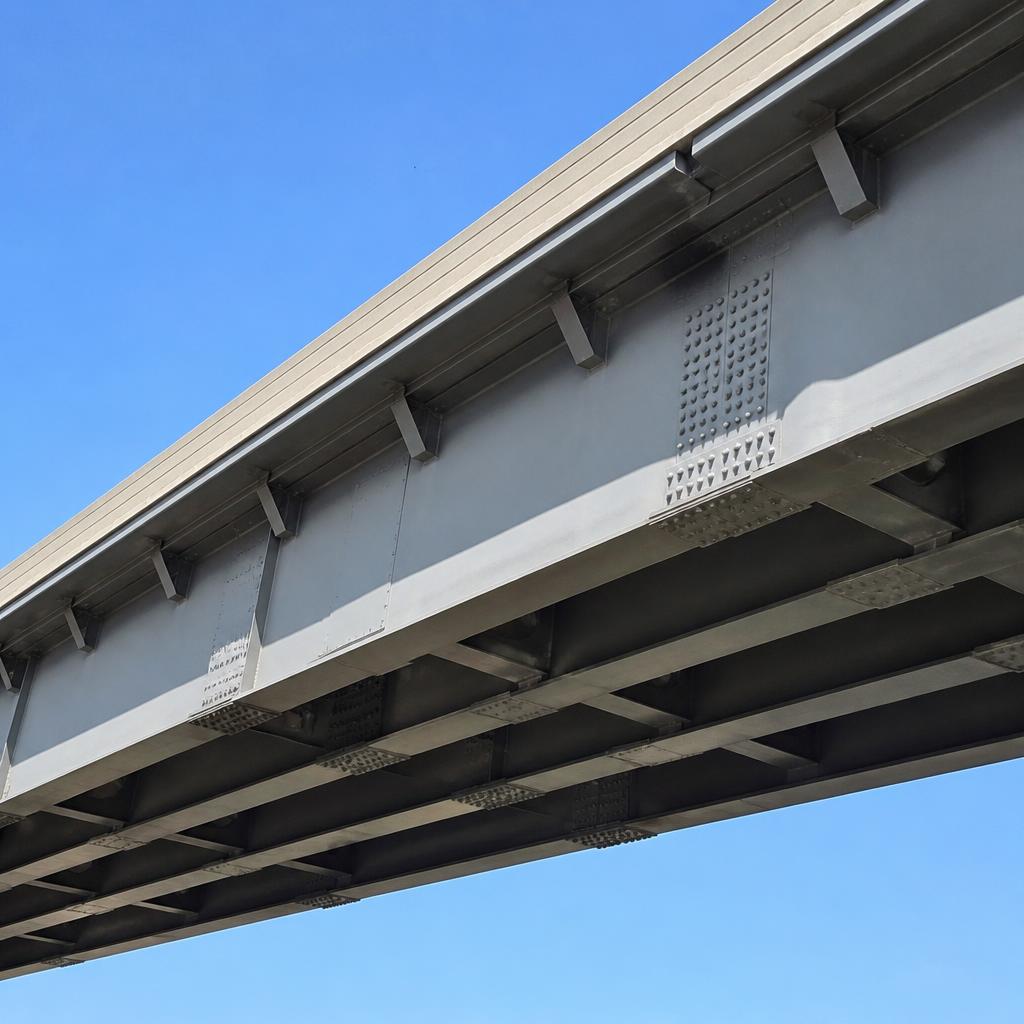
Fatigue-critical infrastructure — a welded steel plate girder carries millions of truck-load cycles over its 75-year design life
Part A. Serviceability (AISC 360-22 Ch. L)
1. What Is a Serviceability Limit State?
A serviceability limit state is any condition that impairs the intended use of a structure without threatening collapse. AISC 360-22 Ch. L identifies four: (i) deflection, (ii) drift, (iii) vibration, and (iv) durability (corrosion, connection slip). Because occupant comfort — not safety — is at stake, checks use unfactored service loads: D, L, W, or S with load factors of 1.0.
Serviceability ≠ strength. A W-shape that passes every strength limit state in Ch. D–H can still be unusable. On long-span composite floors, live-load deflection controls the member size more often than φMn.
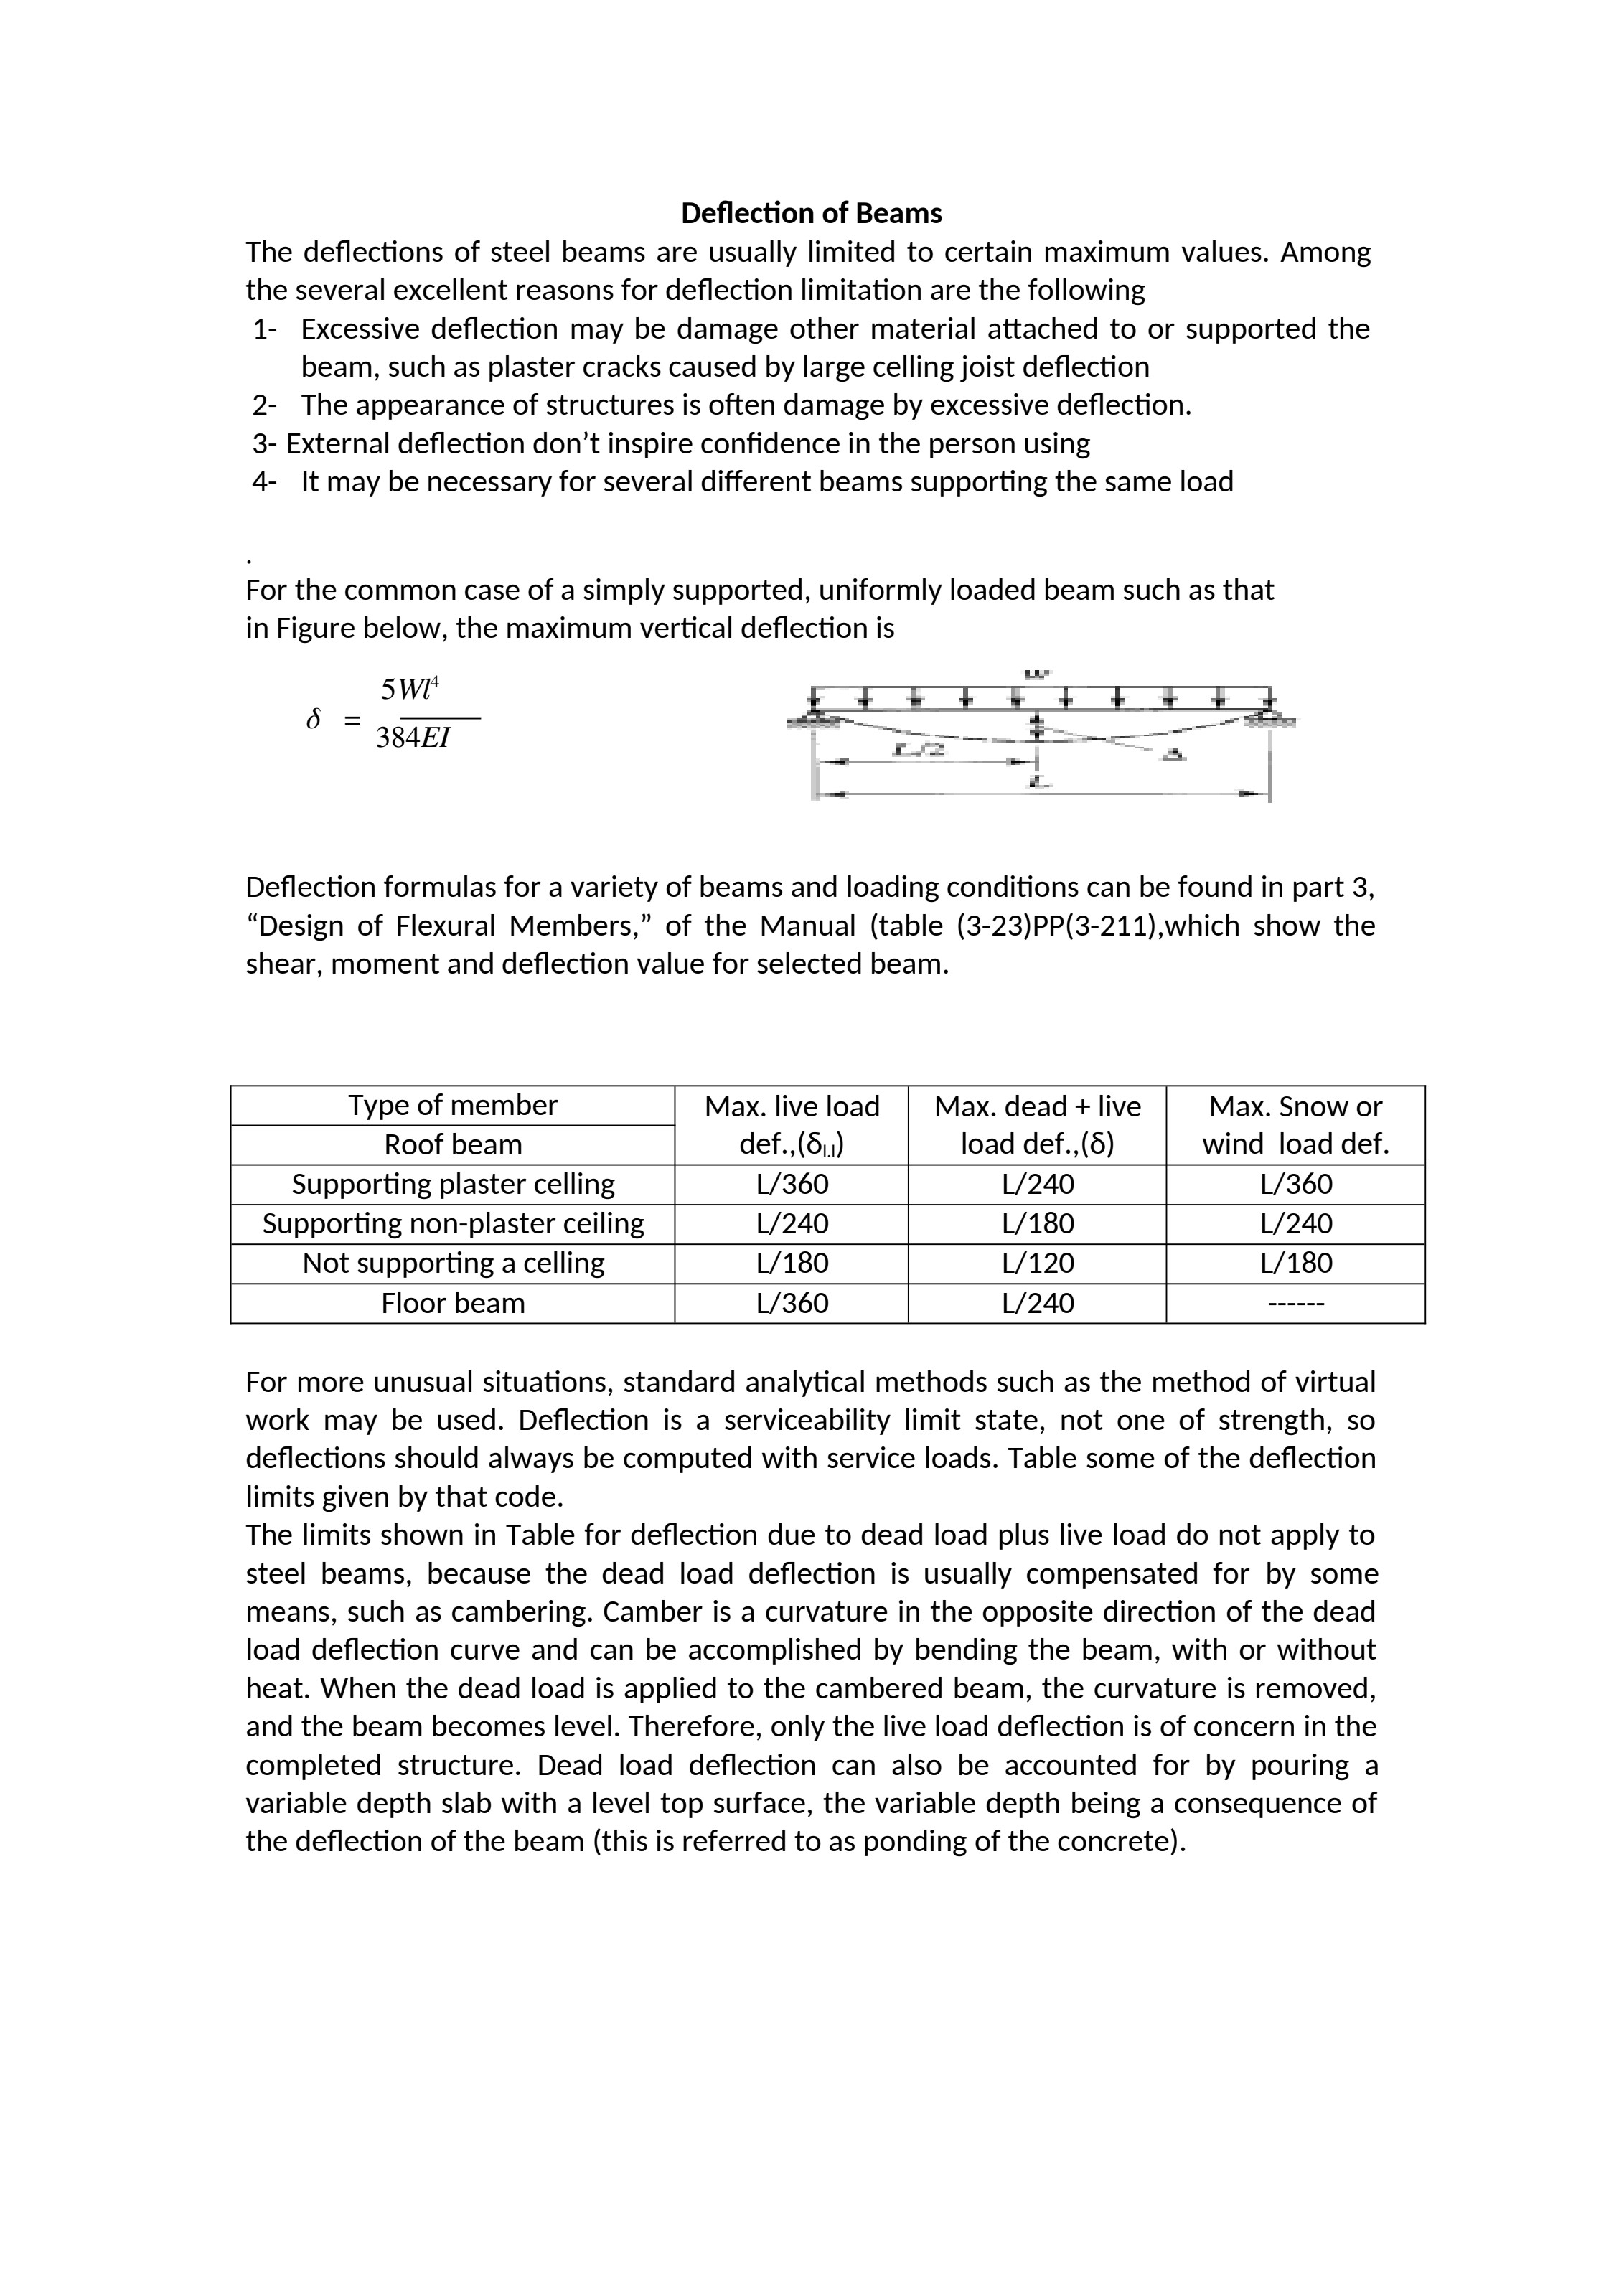
AISC does not mandate specific deflection limits — instead the Commentary tabulates industry practice, and IBC §1604.3 makes them enforceable:
Member
Live-load ΔL
Total ΔD+L
Floor beam supporting plaster / drywall
L/360
L/240
Floor beam, flexible finish (tile, wood)
L/240
L/180
Roof beam, no ceiling
L/240
L/180
Cladding-support beam (brittle facade)
L/480
L/240
Cantilever, floor
L/180
L/120
For a simply-supported uniform beam the closed-form deflection is:
ΔL=384EIx5wLL4(Eq. 18.1)
Units check: w in kip/in, L in inches, E = 29,000 ksi, I in in⁴ → Δ in inches. The most common student error is mixing kip/ft with L in feet.
3. Story Drift (ASCE 7-22 §12.12 / IBC §1604.3)
Wind: Δx/hsx ≤ H/400 for occupant comfort (10-yr wind); H/500 for masonry cladding.
Seismic: Δx/hsx ≤ Δa from ASCE 7 Table 12.12-1, typically 0.020·hsx for Risk Category II buildings.
Seismic drift is computed on amplified displacements Cd·δxe/Ie, not elastic.
4. Floor Vibration — AISC Design Guide 11
Long-span (≥ 30 ft) composite floors and steel-joist floors can pass every deflection check but still bounce disturbingly under normal walking. DG 11 checks two quantities: the fundamental frequency fn and the peak acceleration ratio ap/g.
fn=0.18Δtotalg(Eq. 18.2)
gap=βWPoe−0.35fn≤gao(Eq. 18.3)
where g = 386 in/s², Po = 65 lb (walking excitation), β = 0.03 (open office), W = effective panel weight, and ao/g = 0.005 (offices/residences), 0.015 (shopping malls), 0.05 (rhythmic activities).
Fig. 18.1 — Serviceability envelope. Deflection (L/360), drift (H/400), and vibration (DG-11) are three independent checks, all under unfactored service loads.
5. Camber
Fabricators can pre-cambering a beam upward to offset dead-load deflection. AISC Manual Part 3 recommends camber = 80 % of ΔD for spans ≥ 24 ft. Never camber less than ¾ in — thermal drift and roll-tolerance eat it. Composite beams almost always call for camber because wet-concrete ΔD is large and shouldn't be seen by the occupants.
Part B. Fatigue (AISC 360-22 Appendix 3)
6. What Is Fatigue?
Fatigue is progressive, localized damage accumulated in a metal under repeated cyclic loading, culminating in a crack that propagates until the remaining net section can no longer carry the peak load — at which point the member fails brittlely with little or no warning. Steel members can and do fail in fatigue at nominal stresses far below Fy: a Category E' detail in A992 (Fy = 50 ksi) has a constant-amplitude fatigue threshold of only 2.6 ksi.
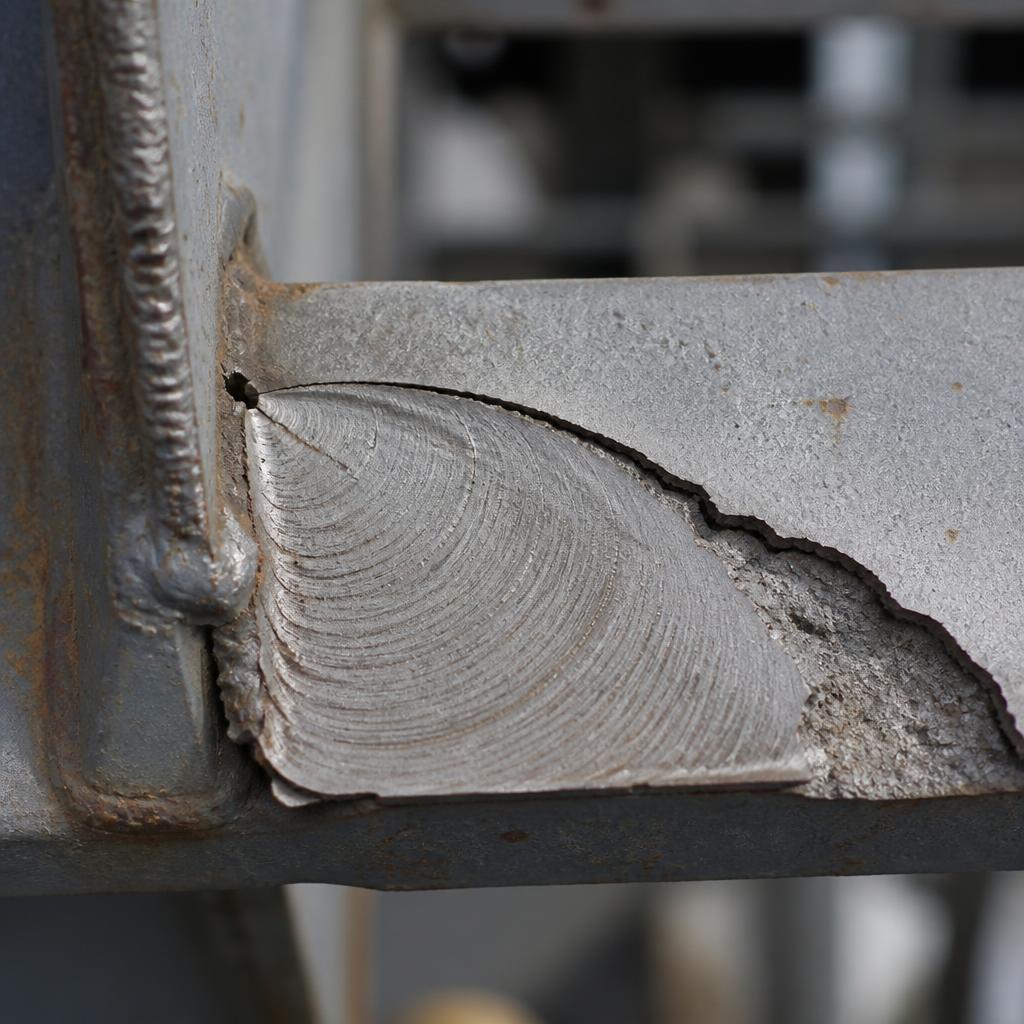
Fig. 18.2 — Beach marks (concentric arcs) on a fatigue fracture surface. Each arc is a rest period during crack growth; the rough zone on the right is the final brittle overload fracture.
7. When Does Appendix 3 Apply?
AISC 360-22 §3.1 requires a fatigue check whenever all three conditions are met:
Cyclic live load produces a net tensile stress at the detail (fatigue is a tension-driven crack phenomenon; pure compression cycles are exempt).
The number of stress cycles N exceeds 20,000 over the service life.
The stress range SR exceeds the detail's constant-amplitude fatigue limit FTH (also called the CAFL).
Wind-loaded members on ordinary buildings almost never satisfy (1) & (2) & (3) simultaneously; crane runways, highway bridges, railway bridges, and support structures for reciprocating machinery almost always do.
Stress range, not peak stress. Fatigue is governed by the range SR = σmax − σmin, calculated from the unfactored (service) cyclic loads. Mean stress and dead-load stress have no effect on Appendix 3 (residual welding stress is assumed tensile and yields the mean).
Fig. 18.3 — Constant-amplitude stress cycle. Only the stress range SR enters the fatigue equation.
8. Stress-Life (S-N) Curves and Detail Categories
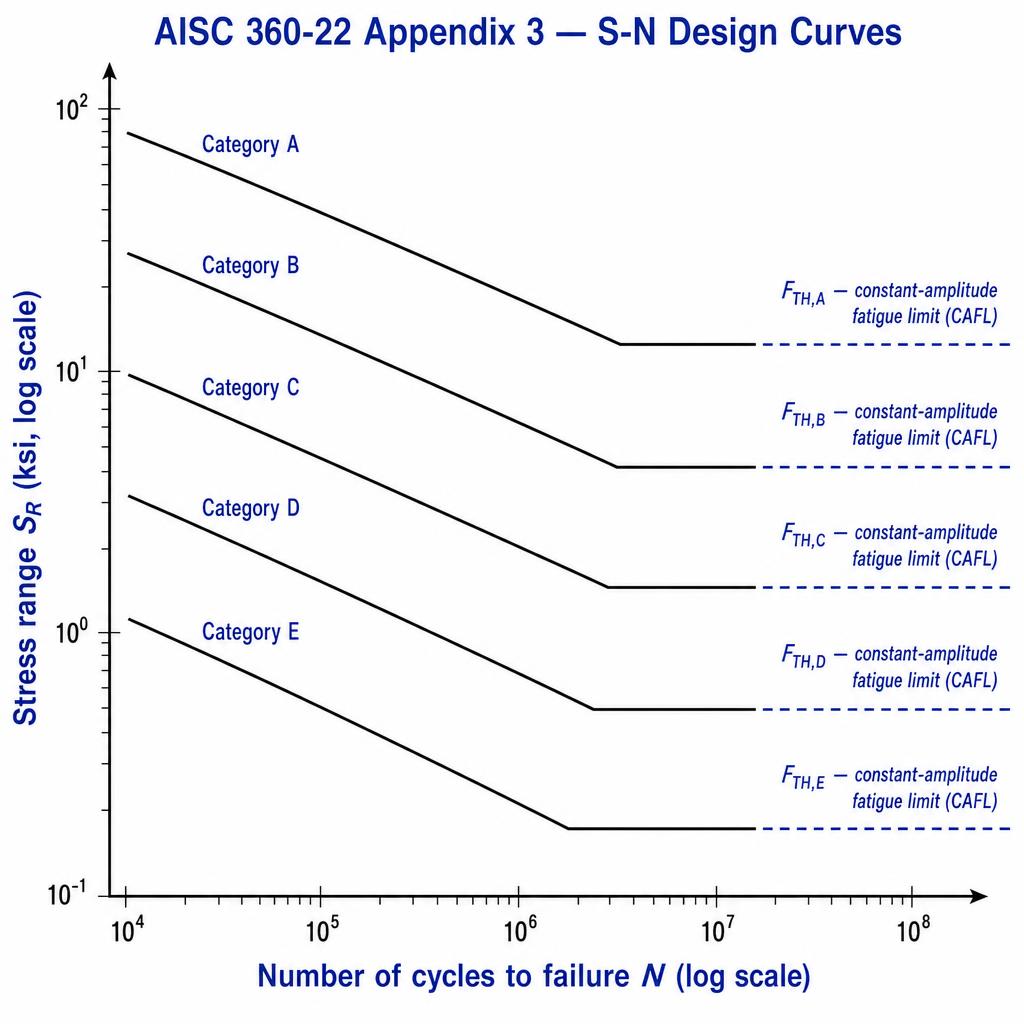
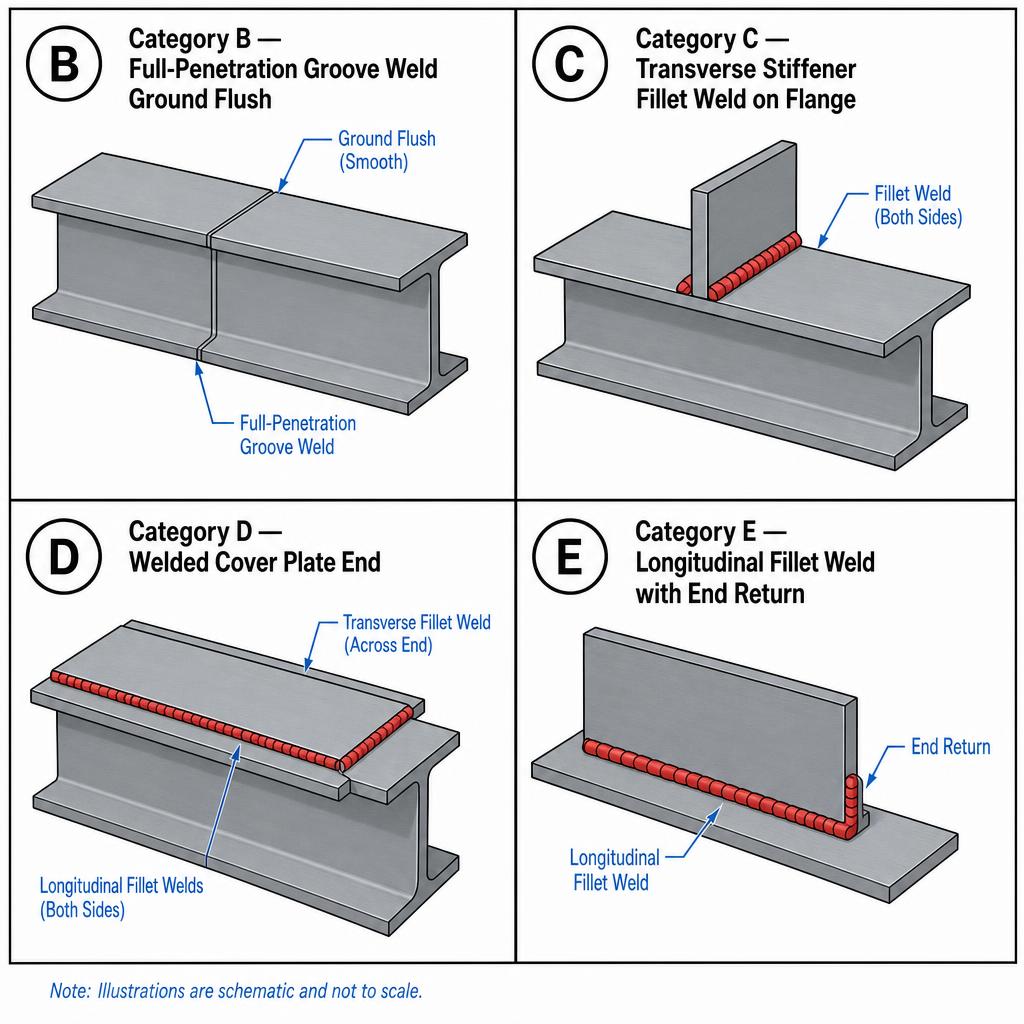
AISC Appendix 3 organizes every welded / bolted / mechanically fastened detail into eight Fatigue Detail Categories: A (best) → B → B' → C → C' → D → E → E' (worst). Category is a property of geometry, not material — the same A992 W-shape can house Category B, C, D, and E details, all under the same service load.
Fig. 18.4 — S-N (stress-life) design curves per AISC 360-22 Appendix 3. Below the horizontal CAFL each category has infinite fatigue life; above it, allowable stress range decays with N−1/3.
where Cf is the constant-life constant (Table A-3.1, ksi³·cycles/10⁸), N is the projected total number of stress cycles, and FTH is the constant-amplitude threshold below which the detail has infinite fatigue life. The design requirement is:
Full-penetration groove weld as-welded (reinforcement in place)
C
44
10
Transverse stiffener fillet welds on beam flange
C'
44
12
Reinforcement of groove welds, ends of PJP welds
D
22
7
Ends of welded cover plates thinner than the flange
E
11
4.5
Longitudinal fillet welds > 4 in. long, cover-plate ends on thick flange
E'
3.9
2.6
Cover-plate end welds on flange plate > 0.8 in. thick, no transverse weld
Values shown are the constants used in AISC 360-22 Table A-3.1. Always look up the exact detail description in the Specification — a “fillet weld” alone is not a category; the geometry, load direction, and inspection level together define the class.
Fig. 18.5 — Representative AISC fatigue detail categories. Smoother geometry, lighter grinding, and inspection all move the detail up the ladder (better FTH).
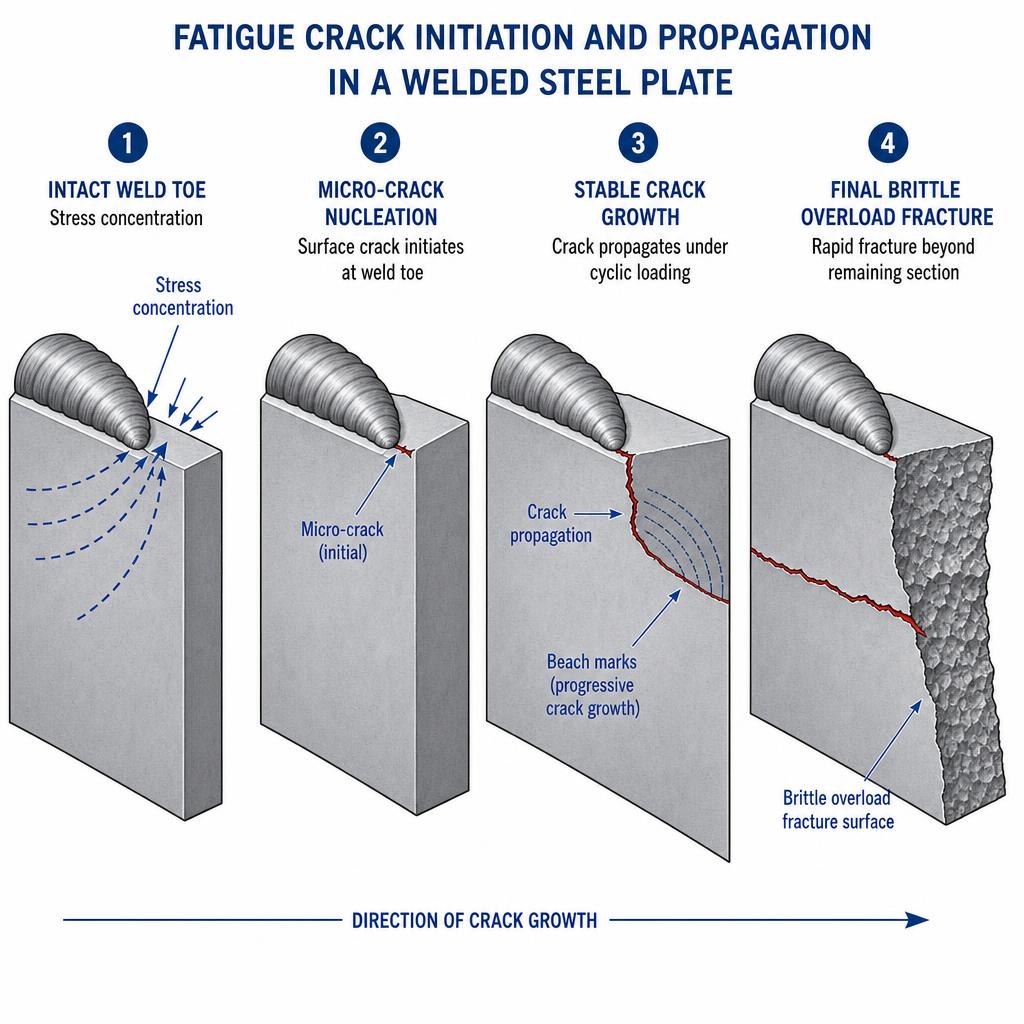
10. Crack Initiation & Propagation
Every fatigue failure follows the same four-stage sequence:
Stress concentration — a weld toe, a bolt hole, a re-entrant corner, an undercut. Local peak stress can be 3–6× nominal.
Micro-crack nucleation — cyclic plastic slip forms an intrusion, typically at a discontinuity or slag inclusion within the first few percent of life.
Stable crack growth — the crack advances a few grain diameters per cycle (Paris law da/dN = C·ΔKm). Beach marks record the progression.
Final overload fracture — the remaining net section reaches its ultimate load; failure is sudden and brittle.
Fig. 18.6 — Four-stage progression from stress concentration at a weld toe (1) → micro-crack (2) → beach-marked stable growth (3) → brittle overload fracture (4).
11. Variable-Amplitude Loading (Miner's Rule)
Real bridges do not see one stress range — an interstate girder sees a full spectrum of truck weights. Palmgren-Miner linear damage summation converts a mixed spectrum to an equivalent constant-amplitude stress range SRe:
SRe=[i∑αi(SRi)3]1/3(Eq. 18.6)
where αi is the fraction of cycles at stress range SRi (Σαi = 1). Design then applies Eq. 18.4 with N = total cycles and SR = SRe. The cube exponent means the largest stress ranges dominate — reducing peaks pays outsized dividends.
Miner's Rule in words. Each cycle at stress range SRi uses up 1/Ni of the fatigue life, where Ni is the constant-amplitude life at that stress range. Damage sums linearly; when Σ(ni/Ni) = 1.0, the detail has been "used up."
12. Bolted & Pin-Connected Details (§3.4)
Bolts loaded in tension use a special S-N curve because thread stress-concentration dominates. Appendix 3 §3.4 gives:
FSRbolt=(N3.9×108)1/3≥7 ksi(based on tensile stress area)(Eq. 18.7)
Pretensioned bolts (slip-critical connections) are largely shielded from cyclic tension because the flange separation must exceed the pretension before the bolt sees any additional stress — a strong argument for pretensioned bolts wherever fatigue governs.
13. Design Workflow
Confirm Appendix 3 applies: net tensile stress, N > 20,000, and SR > FTH. If any fails, no check required.
Identify every detail in the tensile fiber of the member — the base metal and each weld/bolt/hole around it. Assign a Category (A–E') from Table A-3.1.
Compute SR at each detail from the unfactored service live-load stress range. For variable-amplitude loading, apply Eq. 18.6.
Compute FSR from Eq. 18.4 using the projected total N (per-day truck count × 365 × service life is typical).
Check SR ≤ FSR. If not, improve the detail (grind to Category B, remove cover plates, add stop-hole retrofit) or resize.
Design for infinite life when possible: set SR ≤ FTH and no cycle count matters.
14. Retrofit & Repair Strategies
Peening / grinding the weld toe (moves detail up 1 category, e.g. C → B).
Stop-hole drilled at the crack tip — a 1-in. hole arrests the crack and restarts the initiation clock.
Cover-plate removal and replacement with a bolted splice (D → B).
Variable amplitude: Miner's rule with cube exponent → largest stress ranges dominate.
Project case study — Cardinal Square — 4-story braced-frame office
Every chapter's worked example is one step in the design of the same building: Plan: 4 bays N–S × 3 bays E–W, each 30 ft × 30 ft. Stories: 4 @ 13 ft (52 ft roof). Composite floor: 4.5 in NW concrete on 3 VLI20 deck. Roof: 1.5 in B-deck + insulation + membrane. Materials: Wide-flange members A992 (Fy = 50 ksi, Fu = 65 ksi). Plates A572 Gr. 50. HSS bracing A500 Gr. C. Bolts A325-N 7/8 in dia. Welds E70XX. Concrete f'c = 4 ksi. Anchor rods F1554 Gr. 36.
Chapter 18 — Serviceability (deflection)
Same composite filler beam under live load only
Demand carried forward
wL
= 0.50 klf. ΔL
= 5 wL L⁴ / (384 E Ix-comp).
This chapter contributes
Checks ΔL ≤ L/360 = 30·12/360 = 1.0 in. If not met, re-pick a stiffer section and loop back to Chapter 6.
Serviceability limits: LL Δ ≤ L/360, total Δ ≤ L/240, wind drift Δ ≤ H/400 (AISC Ch. L + DG-11).
Chapter 18 — Worked Examples (Serviceability & Fatigue)
How to use. All examples use unfactored (service) stress ranges. Every derivation is written as an aligned KaTeX chain so you can follow it one line at a time. The set covers four contexts:
Decision. W18×35 satisfies both static (L/360, L/240) and DG-11 vibration criteria for a typical office floor. No camber required for this span; if camber is specified, use 0.80·ΔD ≈ 5⁄16 in.
Section B — Buildings & Cranes (Fatigue)
Worked Example 18.2 — Crane Runway Girder, Fatigue Check
Given. A992 W24×84 monorail crane runway supports 10 trolley crossings per hour, 12 h/day, 300 days/yr for a 40-year service life. Each trolley crossing produces one stress cycle with SR = 12 ksi in the bottom flange (unfactored, computed from service crane load). Two details are relevant: (a) bottom-flange base metal (Category B for rolled shapes), (b) transverse stiffener fillet weld to bottom flange (Category C). Check both for infinite life and finite life.
Fig. 18.2a — Crane runway girder with transverse stiffener welded to the tension flange.
Step 1 — Compute N
N=ncyc/hr⋅h/day⋅day/yr⋅yr
XXX=10⋅12⋅300⋅40
XXX=1.44×10⁶ cycles
N > 20 000 → Appendix 3 applies.
Step 2 — Category B (bottom-flange rolled base metal)
Table A-3.1: Cf = 120 × 10⁸, FTH = 16 ksi.
FSR,B=(NCf)1/3
XXX=(1.44×106120×108)1/3
XXX=(8333)1/3
XXX=20.3 ksi
SR = 12 ksi < FTH,B = 16 ksi ⇒ infinite life at the base metal.
Step 3 — Category C (transverse-stiffener weld toe)
Table A-3.1: Cf = 44 × 10⁸, FTH = 10 ksi.
FSR,C=(1.44×10644×108)1/3
XXX=(3056)1/3
XXX=14.5 ksi
SR = 12 ksi < 14.5 ksi ✓ but > FTH,C = 10 ⇒ finite life. Solve for cycles-to-failure:
Nf=SR3Cf
XXX=12344×108
XXX=2.55×10⁶ cycles
XXX≈71 yr
Decision. The base metal has infinite fatigue life; the stiffener-to-flange fillet weld has ≈ 71 years of finite life at N = 1.44×10⁶ over 40 years — marginal. Recommend either (a) grinding the weld toe to move to Category B (infinite life), (b) locating stiffeners on the compression (top) flange, or (c) reducing SR below FTH,C = 10 ksi by upsizing to W24×94.
Section C — Bridges (Fatigue)
Worked Example 18.3 — Highway Bridge Cover-Plate End (Category E)
Given. Simple-span composite plate girder, 90 ft span. Bottom flange plate 20 × ½ in with a partial-length cover plate 8 × ½ in welded to the outside face. The cover-plate ends 25 ft from each support; the cover-plate end weld is Category E. Fatigue truck (HL-93K) produces a stress range at the cover-plate end of SR = 4.8 ksi in the bottom flange. ADTT (single-lane average daily truck traffic) = 500 trucks/day. Design life = 75 yr. Check the detail for infinite life; if not, compute finite life.
Fig. 18.3a — Cover-plate end weld — Category E fatigue detail on tension flange.
Step 1 — Cycles per 75 yr
N=ADTT⋅365⋅yr
XXX=500⋅365⋅75
XXX=1.37×10⁷ cycles
Step 2 — Category E
Table A-3.1: Cf = 11 × 10⁸, FTH = 4.5 ksi.
FSR,E=(1.37×10711×108)1/3
XXX=(80.3)1/3
XXX=4.32 ksi
SR = 4.80 ksi > 4.32 ksi ⇒ NG. Solve for finite life:
Nf=SR311×108
XXX=4.8311×10⁸
XXX=9.94×10⁶ cycles
XXX≈54 yr
Step 3 — Options to Fix
Remove the cover plate and upsize the flange to 20 × ⅝. Bottom-flange base metal is Category B (FTH = 16 ksi) → infinite life.
Replace weld with a bolted splice: pretensioned bolts → Category B behavior.
Reduce SR below FTH,E = 4.5 ksi by increasing the flange plate.
Decision. Redesign — either eliminate the Category E cover-plate end weld or specify UIT retrofit. This is the exact detail that motivated AASHTO's rule against unshaped cover-plate ends on new bridges (post-1990 practice).
Worked Example 18.4 — Variable-Amplitude Truck Spectrum (Miner's Rule)
Given. Same cover-plate-end Category E detail. Instead of a single design truck, WIM (weigh-in-motion) data gives a variable-amplitude spectrum:
Fig. 18.4a — Measured stress-range spectrum from WIM data at a rural interstate.
Stress range SRi (ksi)
Fraction αi
αi·SRi³
4.0
0.55
0.55·64 = 35.2
6.0
0.30
0.30·216 = 64.8
9.0
0.12
0.12·729 = 87.5
14.0
0.03
0.03·2744 = 82.3
Sum
1.00
269.8
Step 1 — Equivalent Constant-Amplitude Stress Range (Eq. 18.6)
The 3 % of trucks at 14 ksi contribute 82.3 / 269.8 = 31 % of the damage. Legal-load screening that removes the top few percent of overloads is the most effective fatigue mitigation for existing bridges.
Decision. Retrofit required. UIT of the cover-plate end welds combined with an enforcement program that eliminates the 14-ksi overload tail typically buys another 40+ years of life.
Section D — Machinery & Industrial (Fatigue)
Worked Example 18.5 — Reciprocating Compressor Support Bracket
Given. A cantilever steel bracket supports a natural-gas reciprocating compressor rotating at 720 rpm. The dynamic unbalanced force produces a bending stress range SR = 7 ksi at the Category C weld toe between the bracket web and the pedestal cap plate. Machine runs continuously (24 / 7). Owner requires a 25-year fatigue life plus a check of the constant-amplitude fatigue limit (CAFL) because the load is truly constant-amplitude and effectively infinite-cycle.
Fig. 18.5a — Reciprocating compressor pedestal bracket with cyclic bending at the weld toe.
Step 1 — Cycles per 25 years
N=nrpm⋅60⋅24⋅365⋅yr
XXX=720⋅60⋅24⋅365⋅25
XXX=9.46×10⁹ cycles
N is well beyond the transition at ≈ 5×10⁶ cycles ⇒ the only criterion that matters is the CAFL (FTH).
Step 2 — Category C threshold (Eq. A-3-1)
Table A-3.1 for Cat. C: FTH = 10 ksi. Because N is essentially infinite, AISC forces SR ≤ FTH:
SR=7 ksi
XXX≤FTH,C=10 ksi✓
The finite-life curve would give FSR = (44×10⁸ / 9.46×10⁹)1/3 ≈ 0.76 ksi — meaningless. The CAFL governs.
Step 3 — What if a resonance amplifies SR to 12 ksi?
SR=12 ksi
XXX>FTH,C=10 ksi⇒finite life only
Nf=SR3Cf
XXX=12344×108
XXX=2.55×10⁶
XXX≈2.5 days
This is the classic rotating-equipment lesson: any stress excursion above the CAFL destroys the infinite-life assumption in days, not years. Structural fatigue design for machine supports is really a vibration problem — keep SR below FTH under the worst credible operating condition (start-up, resonance sweep, load rejection).
Decision. SR = 7 ksi is well under FTH,C = 10 ksi → infinite life. Require the vibration monitor to alarm at SR = 9 ksi (0.9 FTH) and trip at 10 ksi. Best practice: upgrade the weld toe to Category B (grind + UIT) so FTH = 16 ksi and gives a real safety margin against resonance.
Worked Example 18.6 — Vibrating-Screen Support Beam (Bolted vs Welded)
Given. A W16×36 beam supports a mining vibrating screen operating at 16 Hz. Peak dynamic reaction at the beam midspan produces a bending stress range SR = 8 ksi. Duty cycle: 20 h/day, 350 day/yr, 25-yr life. Compare two attachment details of the screen frame to the beam top flange: (a) pretensioned high-strength bolts (Category B) and (b) 3⁄8-in fillet weld to a longitudinal stiffener (Category E).
Fig. 18.6a — Same beam, two attachment strategies, dramatically different fatigue life.
Step 1 — Cycles
N=f⋅3600⋅h/day⋅day/yr⋅yr
XXX=16⋅3600⋅20⋅350⋅25
XXX=1.01×10¹⁰ cycles
Again essentially infinite — CAFL governs.
Step 2 — Option (a): Pretensioned bolted attachment (Cat. B)
Decision. Welded attachment fails in under 2 operating days; bolted attachment gives infinite life. This is why every vibrating-screen manufacturer catalog specifies bolted or clamped connections between the screen and its supporting steel — never welded. Same beam, same stress, five orders of magnitude difference in life because of the detail category.
Worked Example 18.7 — Rooftop AHU Steel Frame, Wind-Induced Fatigue
Given. A rooftop air-handling unit (AHU) is supported on four HSS 6×6×3/8 posts welded (CJP) to base plates bolted to the roof structure. Wind buffeting produces measured across-wind oscillations at f = 2.4 Hz with an equivalent stress range SR = 5 ksi at the CJP weld toe (Cat. C' — CJP with backing bar left in place). Building operates in windy conditions ≈ 40 % of the time; design life = 50 yr. Check fatigue.
Fig. 18.7a — Wind-induced across-wind buffeting excites the HSS post at its base weld.
Table A-3.1 for CJP with backing bar (Cat. C'): FTH = 7 ksi.
SR=5 ksi
XXX≤FTH,C′=7 ksi✓
Step 3 — Sensitivity — what if buffeting doubles under a 50-yr wind?
SR=10 ksi
XXX>FTH,C′=7 ksi⇒finite life
Nf=10344×108
XXX=4.4×10⁶ cycles
tf=f⋅3600⋅24⋅pwindNf
XXX=2.4⋅3600⋅24⋅0.404.4×106
XXX≈53 days of storm exposure
Rare storms move the AHU frame from "infinite" to "days" — so infinite-life design at the mean wind is not conservative for wind-buffeted equipment. Best practice is to check the fatigue-limit stress under the 50-yr wind gust, not just the mean.
Decision. At the operating condition (SR = 5 ksi) the frame satisfies fatigue by CAFL. Recommend: (1) remove the backing bar and back-gouge to upgrade to Category B (FTH = 16 ksi), (2) add vibration isolators between AHU and frame to cut SR by 60–80 %.
Section E — PE-Style Practice Problems (AISC 360 Appendix 3)
Worked Example 18.8 — Finite Fatigue Life: Highway Bridge Cover-Plate End (Cat. E′)
Given. A welded cover-plate termination on the tension flange of a highway bridge beam. Traffic averages 3 truck cycles/day over a 50-year design life. Stresses at the detail: dead-load σD = 12.0 ksi (steady), live-load σmax = +14.5 ksi, σmin = −2.0 ksi. Determine whether the beam is adequate for fatigue per AISC 360 Appendix 3.
Welded cover-plate termination on a rolled-shape flange:
Stress Category: E′
Detail constant Cf = 3.9 × 10⁸
Threshold FTH = 2.6 ksi
Step 3 — Allowable Stress Range FSR
FSR=(NCf)0.333
XXX=(54,7503.9×108)0.333
XXX=(7123.3)0.333
XXX≈19.24 ksi
FSR = 19.24 ksi > FTH = 2.6 ksi, so the finite-life value governs.
Step 4 — Applied Live-Load Stress Range Δf
Dead-load stress (12.0 ksi) is steady and omitted from the fatigue range.
XXXΔf=σmax−σmin
XXX=14.5−(−2.0)
XXX=16.5 ksi
Step 5 — Adequacy Check
XXXΔf=16.5 ksi
XXX≤FSR=19.24 ksi✓
✅ Final Answer. FSR = 19.24 ksi and Δf = 16.5 ksi. The beam is Adequate for finite-life fatigue at the Category E′ cover-plate end.
Worked Example 18.9 — Infinite Fatigue Life: Crane Runway Slip-Critical Bolt Hole (Cat. B)
Given. A crane runway girder with a slip-critical pretensioned bolted splice. The base metal at the bolt hole is Category B. Duty: 15 cycles/hr · 16 h/day · 250 day/yr · 20-yr life. Live-load moment range Mmax = 320 k-ft, Mmin = 0. Section modulus Sx = 244 in³. Check fatigue adequacy.
Fig. 18.9a — Crane runway girder with slip-critical bolted splice (Category B base metal at bolt hole).
Per AISC Appendix 3, FSR cannot be less than the constant-amplitude threshold FTH:
FSR=max(FSR,finite,FTH)
XXX=max(10.0,16.0)
XXX=16.0 ksi
Step 4 — Applied Live-Load Stress Range Δf
XXXΔM=Mmax−Mmin
XXX=320−0
XXX=320 k-ft=3,840 k-in
XXXΔf=SxΔM
XXX=2443,840
XXX≈15.74 ksi
Step 5 — Adequacy Check
XXXΔf=15.74 ksi
XXX≤FSR=16.0 ksi✓
✅ Final Answer. The threshold FTH = 16.0 ksi governs and Δf = 15.74 ksi. The girder is Adequate with a razor-thin margin — a small increase in wheel load would push the detail into finite life. Recommend upsizing Sx or specifying a higher-category detail.
Worked Example 18.10 — PE-Style Challenge: W8×31 Hanger with Slip-Critical Bolt Splice
Given. A structural hanger uses a W8×31 in pure axial tension, spliced at its base by 4 × 7/8-in A325 bolts (two per flange, longitudinal pitch 3.0 in), pretensioned in slip-critical configuration. Service axial loads: PD = 45.0 k (steady); cyclic live load PL,max = 60.0 k, PL,min = 10.0 k. Duty: 20 cycles/day, 25-yr life. Determine whether the base metal at the bolt-hole cross-section is fatigue-adequate per AISC 360 Appendix 3.
Fig. 18.10a — W8×31 tension hanger with 4 pretensioned high-strength bolts in a slip-critical splice.
Base metal at slip-critical pretensioned bolted joint:
Stress Category: B
Cf = 12.0 × 10⁸
FTH = 16.0 ksi
Step 6 — Allowable Fatigue Stress Range FSR
FSR,finite=(NCf)0.333
XXX=(182,50012.0×108)0.333
XXX=(6575.34)0.333
XXX≈18.72 ksi
FSR=max(FSR,finite,FTH)
XXX=max(18.72,16.0)
XXX=18.72 ksi
Step 7 — Applied Live-Load Stress Range Δf
Dead load is steady and omitted; fatigue uses net area for base-metal-at-hole checks.
XXXΔPL=PL,max−PL,min
XXX=60.0−10.0
XXX=50.0 k
XXXΔf=AnΔPL
XXX=7.3950.0
XXX≈6.77 ksi
Step 8 — Adequacy Check
XXXΔf=6.77 ksi
XXX≤FSR=18.72 ksi✓
✅ Final Answer. Δf = 6.77 ksi << FSR = 18.72 ksi. The W8×31 base metal at the slip-critical bolt-hole cross-section is Adequate for fatigue over the 25-year design life.
Worked Example 18.11 — PE-Style Challenge: WT7×34 Tension Chord with Longitudinal Fillet Welds Only (Cat. E)
Given. A WT7×34 (A992) tension chord is connected to a gusset by longitudinal fillet welds along the flange heels only (no transverse weld, stem unattached). Weld length l = 9.5 in. Service axial loads: PD = 35.0 k (steady); cyclic PL,max = +90.0 k, PL,min = −10.0 k (reversal). N = 2.2 × 10⁶ cycles over 20-yr life. Check fatigue adequacy of the base metal at the weld termination.
Fig. 18.11a — WT7×34 with longitudinal fillet welds on flange heels only; stem unattached ⇒ shear lag governs.
Base metal at the termination of longitudinal fillet welds where bf > l (weld shorter than flange width): Category E.
Stress Category: E
Cf = 1.1 × 10⁸
FTH = 4.5 ksi
Step 5 — Allowable Fatigue Stress Range FSR
FSR,finite=(NCf)0.333
XXX=(2,200,0001.1×108)0.333
XXX=(50.0)0.333
XXX≈3.68 ksi
FSR=max(FSR,finite,FTH)
XXX=max(3.68,4.5)
XXX=4.5 ksi
Step 6 — Applied Live-Load Stress Range Δf
Dead load is steady and omitted; use Ae so shear-lag stress concentration is reflected.
XXXΔPL=PL,max−PL,min
XXX=90.0−(−10.0)
XXX=100.0 k
XXXΔf=AeΔPL
XXX=8.64100.0
XXX≈11.57 ksi
Step 7 — Adequacy Check
XXXΔf=11.57 ksi
XXX>FSR=4.5 ksi×
❌ Final Answer. Δf = 11.57 ksi >> FSR = 4.5 ksi. The WT7×34 base metal is Inadequate and will fail in fatigue well before the 20-year design life. Remedies: (1) extend weld length to l ≥ 2bf to raise the category, (2) add transverse weld across the flange tip to move out of Cat. E, (3) upsize to a WT with higher Ag and connect the stem to eliminate shear lag, or (4) apply post-weld UIT to shift +2 categories.
Section F — Additional Deflection (Serviceability) Examples
Worked Example 18.12 — W24×55 Floor Beam Live-Load Deflection Check
Given. A W24×55 (A992) filler beam spans L = 21 ft, simply supported, and carries a service live UDL wL = 3.0 k/ft. Ix = 1350 in⁴, E = 29 000 ksi. Ceiling finish attached ⇒ limit ΔL ≤ L/360.
Fig. 18.12 — Live-load deflection at midspan of a W24×55.
Step 1 — Convert Units
wL
XXX=12 in/ft3.0 k/ft
XXX=0.250 k/in
L
XXX=21 ft⋅12
XXX=252 in
Step 2 — Midspan Deflection (uniform load)
XXXΔL=384EIx5wLL4
XXX=384(29000)(1350)5(0.250)(252)4
XXX=1.504×10105.037×109
XXX≈0.335 in
Step 3 — Compare to Serviceability Limit
XXX360L
XXX=360252
XXX=0.700 in
XXXΔL=0.335 in
XXX<0.700 in✓
✅ OK — 48 % utilization. The W24×55 satisfies the L/360 live-load deflection limit with generous margin.
Worked Example 18.13 — W18×35 Roof Beam vs L/360
Given. A W18×35 (A992) roof filler spans L = 30 ft, simply supported. Service live UDL wL = 0.55 k/ft. Ix = 510 in⁴.
Fig. 18.13 — Roof beam under uniform live load.
Step 1 — Compute Deflection
wL
XXX=0.55/12
XXX=0.04583 k/in
XXXΔL=384EIx5wLL4
XXX=384(29000)(510)5(0.04583)(360)4
XXX=5.68×1093.85×109
XXX≈0.678 in
Step 2 — Check L/360
XXX360L
XXX=360360
XXX=1.00 in
0.678
XXX<1.00✓
✅ OK — 68 % utilization. W18×35 passes L/360. If a plaster ceiling is added, re-check against the stricter L/480 limit (0.75 in) — still marginally OK.
Worked Example 18.14 — Maximum PL on a W14×68 by Deflection
Given. A W14×68 (A992) beam spans L = 24 ft simply supported and carries a single concentrated live load PL at midspan (dead load steady, not part of live deflection). Ix = 722 in⁴. Ceiling attached ⇒ ΔL ≤ L/360. Determine the largest PL the beam can carry without violating serviceability.
Fig. 18.14 — Midspan point-load deflection.
Step 1 — Deflection Formula (concentrated load at midspan)
XXXΔL
XXX=48EIxPLL3
Step 2 — Set ΔL = L/360, solve for PL
XXX48EIxPLL3
XXX=360L
PL,max
XXX=360L248EIx
XXX=7.5L2EIx
Step 3 — Substitute Numbers
PL,max
XXX=7.5(288)2(29000)(722)
XXX=6.220×1052.094×107
XXX≈33.7 k
Step 4 — Verification
XXXΔL
XXX=48(29000)(722)33.7(288)3
XXX=1.005×1098.05×108
XXX=0.800 in=L/360✓
✅ Final Answer. PL,max ≈ 33.7 kips at midspan governs the W14×68 by serviceability. Strength (φbMp) must still be checked — for A992, Zx = 115 in³, φbMp = 431 k-ft ≫ PuL/4 with typical load factors, so deflection governs.
Independent Practice
A pedestrian steel bridge girder has a partial-length longitudinal fillet weld (Cat. E) attached to the tension flange. Estimated N = 2×10⁶ cycles over 50 yr, SR = 3.2 ksi. Does the detail have infinite life? If not, what Nf does it have?
A composite W24×55 floor beam spans 32 ft with wL = 0.60 klf service. Ieff = 1650 in⁴. Check ΔL against L/360.
A moment-frame column has a story height hsx = 13 ft. Under service wind, δx = 0.48 in. Compare to the H/400 wind-drift limit.
A support bracket for a reciprocating compressor sees SR = 15 ksi at a Category C weld toe, N = 10 million cycles/yr, 30-yr life. Check infinite and finite life.
A wind-turbine tower base weld (Cat. C', FTH = 7 ksi) sees SR = 6 ksi at 0.6 Hz nacelle motion, operating 8000 h/yr, 20-yr life. Infinite life?
A vibrating-conveyor support beam (f = 12 Hz) uses a bolted (Cat. B) clip and a welded (Cat. E) gusset carrying the same SR = 9 ksi. Compare fatigue life of each detail.
FE-Style Worked Examples(6)
Each example mirrors the NCEES FE Civil Reference Handbook style: brief givens, a labeled figure, AISC section reference, step-by-step numeric solution, and a single boxed answer.
Serviceability limit typically L/240 (LL) or L/360 (total)
Course Materials — Lecture & Worked Examples
Lecture and examples below are extracted from the instructor's 'Deflection of Beams' notes. Service-load deflections (not factored!) are compared to code limits L/360, L/240, L/180.
Use SERVICE loads (no load factors) in every deflection calc. Convert: w in k/in, L in inches.
Simply-supported UDL: δ = 5wL⁴/(384 EI). Concentrated load at midspan: δ = PL³/(48 EI). Combine cases by superposition.
Make sure I corresponds to the bending axis — I_xx for major-axis bending, I_yy for minor-axis bending.
AISC modified equation (simple span I-shapes & channels): δ = ML²/(C₁·I), where M is in k-ft, L in ft, I in in⁴, and C₁ depends on the loading pattern (Manual Fig. 3-2). For UDL on a simple span C₁ = 161; for point load at midspan C₁ = 201.
Dead-load deflection is typically removed by cambering the beam, so only live-load deflection matters in service.
These questions reference AISC Steel Construction Manual (16th ed.) — sections, equations, and tables are cited explicitly. Use a calculator. Each question offers a clue you may reveal before answering. Submissions are recorded to your account once signed in.
C18-01AISC 360-22 §L
1. AISC 360-22 §L1 covers:
C18-02AISC 360-22 §L3 & IBC
2. Typical floor live-load deflection limit:
C18-03ASCE 7-22 App. CC
3. Wind drift story limit for buildings (unfactored):
C18-04ASCE 7-22 §12.12
4. Seismic drift limit (Δ) for Risk Cat II bldgs, common story:
C18-05AISC DG-11 (2nd ed.)
5. Floor vibration typically checked per:
C18-06AISC DG-11
6. Fundamental natural frequency for typical office floor should exceed:
Attach your handwritten or typed step-by-step solution for this chapter's graded quiz. The instructor can download every submission. PDF only, up to 25 MB.
How your upload will be graded
Your file — PDF, Word document, scanned handwriting or a photo — is read page by page like an experienced structural engineering instructor would. The scan is validated first, then your reasoning, structural model, calculations, diagrams, code basis and final answers are graded on process, not just the final number. Design work is additionally reviewed against AISC 360-22 and ACI 318-19. Partial credit applies, and one early mistake carried correctly forward is only penalized once.
Before you attach the file
Include every page, in order and right way up — a missing page cannot earn credit.
Keep margins in frame: nothing cropped at the edges, especially boxed final answers.
Scan or photograph in good, even light — no shadows, glare or blur; 300 dpi or a steady phone scan.
Write in dark pen; faint pencil is the most common 'UNREADABLE — INSTRUCTOR REVIEW REQUIRED' flag.
Include all diagrams, FBDs, shear/moment diagrams and section sketches — label them.
Number each question the same way the assignment does, and note anything you skipped.
Show units on every line and box your final answers.
Combine everything into ONE file (PDF preferred; Word, JPG or PNG accepted) under 20 MB.