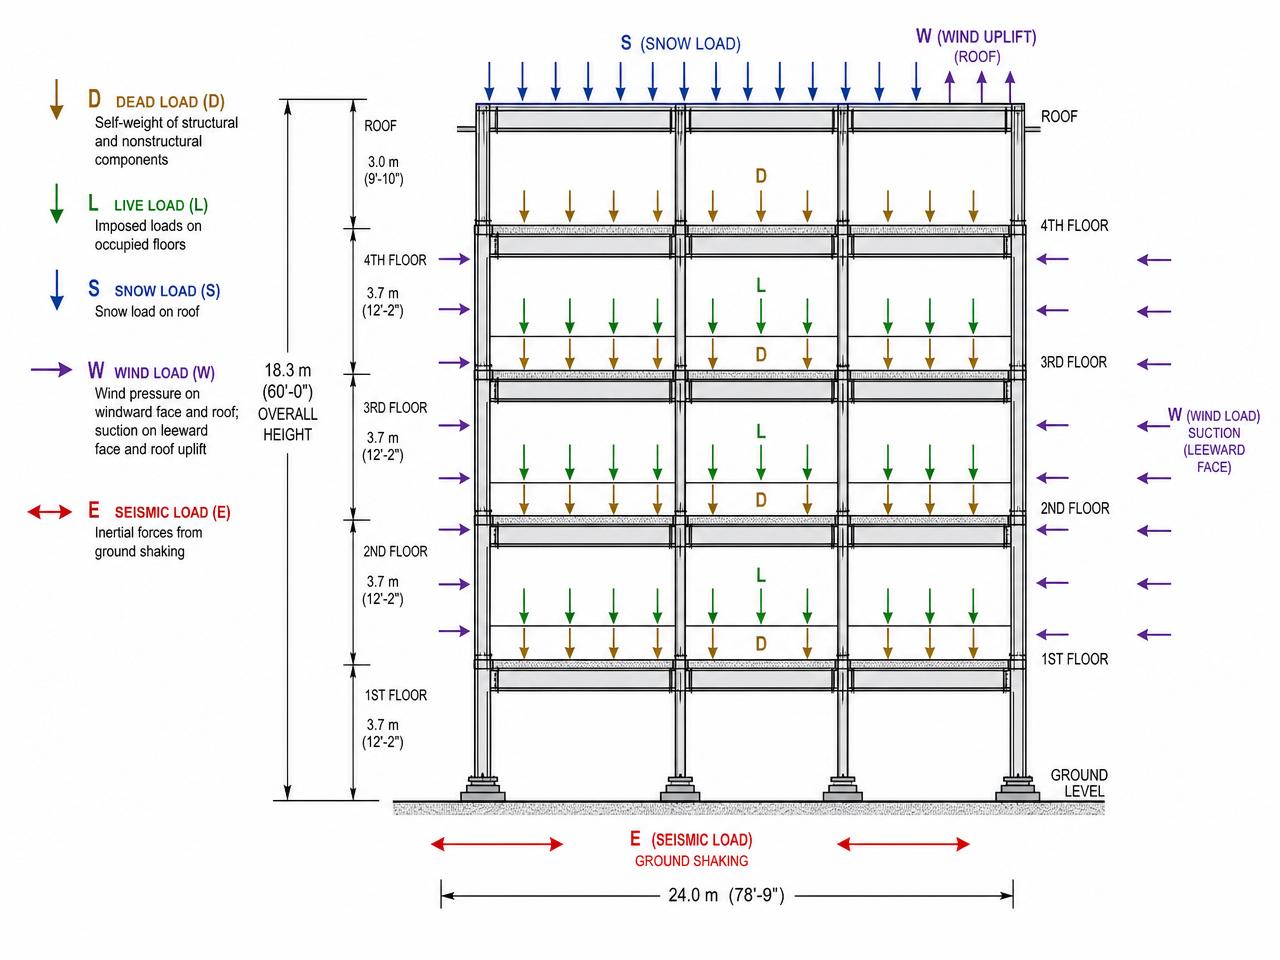
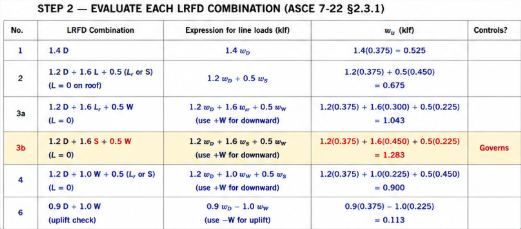
ASCE 7 combines dead, live, roof-live, snow, rain, wind and seismic loads through seven strength-level combinations to bound the worst-case demand.
Chapter 2 covers the LRFD philosophy — factored loads on the demand side, resistance factors on the capacity side — and walks through the seven ASCE 7 strength combinations plus the 0.9D counter-cases for wind/seismic uplift.
Iconic steel structures built on engineering excellence
One combo controls each demand; miss one and you may under-design for uplift.
Where it is used
Every gravity, wind, and seismic design.
Connects to
ASCE 7-22 §2.3.
Objective 03
Identify the governing combo
Compute Ru from each applicable combo and take the maximum. For uplift, use 0.9D + 1.0W or 0.9D + 1.0E.
Why it matters
The governing combo is not always Combo 2 — snow, wind, and seismic each control in different regions.
Where it is used
Foundation uplift, roof design, façade attachments.
Connects to
ASCE 7-22 §2.3.1.
Objective 04
Check uplift (0.9D + 1.0W or 1.0E)
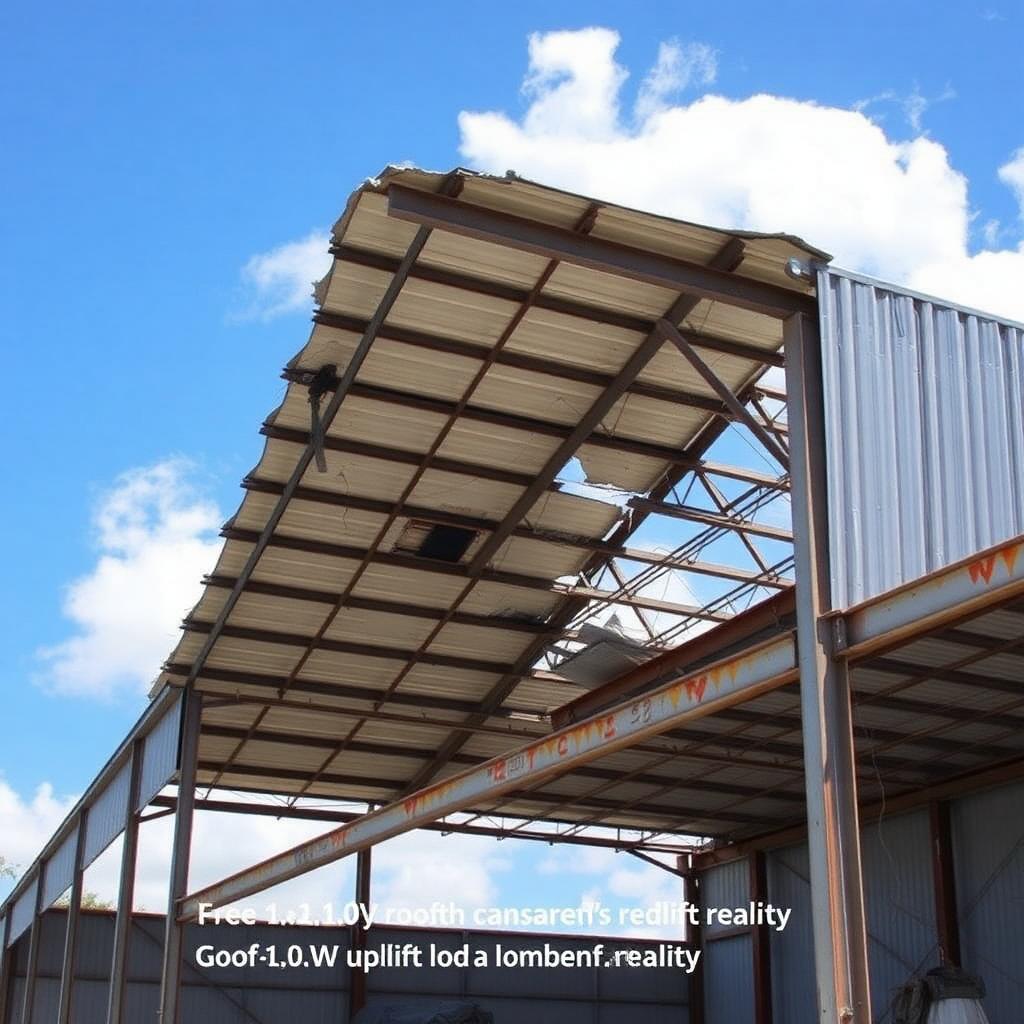
In hurricanes and earthquakes, dead load resists uplift. 0.9D bounds the case where D is minimum and W/E is maximum.
Why it matters
Neglecting the 0.9 factor is the classic light-frame roof-lift-off failure.
Where it is used
Roof diaphragms, foundation anchors, light-gauge steel.
Connects to
ASCE 7-22 §2.3.6.
Objective 05
Contrast LRFD with ASD
ASD uses Rn/Ω ≥ Ra with service loads and a single safety factor; LRFD splits into load and resistance factors calibrated by probability.
Why it matters
The two methods produce different reserve capacities on the same section.
Where it is used
AISC still permits ASD; some legacy calcs mix.
Connects to
AISC 360-22 B3.2.
Objective 06
Use unfactored loads for serviceability
Deflection and vibration checks use D + L (no load factors) because they are elastic-response limits, not strength limits.
Why it matters
Applying 1.2D + 1.6L to a deflection check gives absurd deflections.
Where it is used
L/360 live-load deflection, L/240 total deflection.
Connects to
AISC Manual Part 3, IBC serviceability.
03
Engineering motivation
What each part of a steel-frame building actually does — and why it exists
Before you design any single member, you have to see the whole system. A steel-frame building is not a collection of independent shapes bolted together — it is a deliberate load path, engineered so that every kilonewton of gravity, wind, or seismic demand has a continuous route from where it starts to the ground where the earth can resist it.
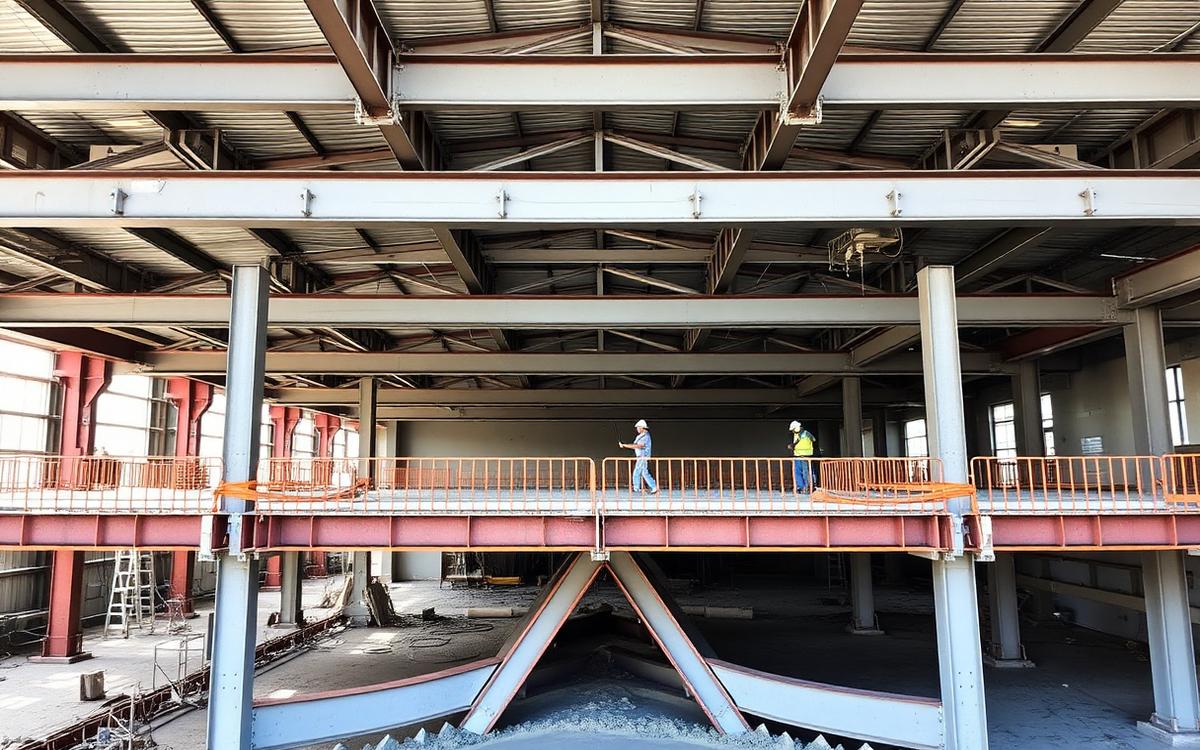
The photograph below shows a typical steel framing detail. Drag each labelled chip onto the structural element it names — the drop is only accepted when it lands inside the correct element's outlined region. A correct answer locks in with a green outline and a short explanation; a wrong answer flashes the region red, tells you what you actually hit, and returns the chip so you can try again. Press Reveal expected placements to see the reference solution (that attempt is then marked as assisted).
Fig. 1.3 · Drop a chip inside the outlined element it names. Green = correct and locked; red flash = wrong element, chip returns.
04
Failure mechanisms
Why we design the way we do — six ways steel structures have failed, and what each disaster taught the profession
Every provision in AISC 360 is a scar. Behind each equation, load factor, and detailing rule is a bridge, a walkway, or a tower whose failure cost lives and rewrote the profession. The six case studies below trace the mechanisms that motivate the code you are about to learn.
Read each one as an engineer, not a spectator: identify the load, the limit state, the missing check, and the specific clause that exists today because that check was missed. When you meet those clauses again in Chapters 5–17, they will read as answers, not rules.
Case 01
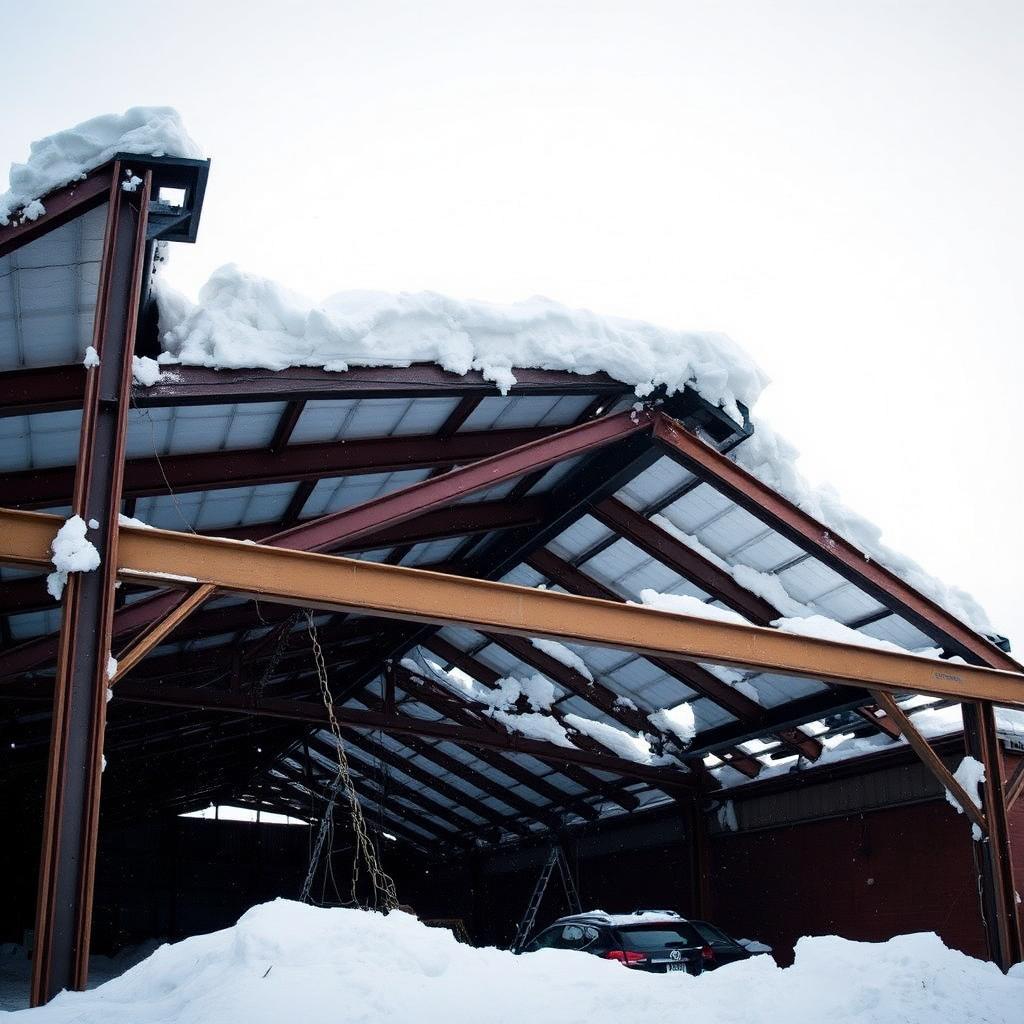
Fig. 1.4.1 · Snow-load overload
Failure mechanism
Snow-load overload
Roof snow exceeded design pg and the joists collapsed.
Root cause
Ru from 1.2D+1.6(S) not envelope-checked against local Pg.
Lesson learned
Always use site-specific ground snow and importance factor.
Engineer used 1.2D+1.6L when 1.2D+1.0W+L governed for a tall façade column.
Root cause
Only ran gravity combos.
Lesson learned
Run every applicable ASCE 7 combo; identify the maximum.
§ASCE 7-22 §2.3.1
How failure propagates
The five-stage failure progression
1Service loads
2Factored via ASCE 7
3Envelope max Ru
4Compare to φRn
5Pass/fail decision
Design codes intervene at the transition from yield to instability. Everything before yield is elastic and reversible; everything after instability is a race to collapse. LRFD keeps the demand well below the first transition.
05
Lecture notes
The full textbook chapter — figures, equations, and engineering narrative
Reflection · Think before you read
Why do we multiply loads by factors greater than 1.0 and resistances by factors less than 1.0 instead of using a single global safety factor? What real-world uncertainty is each φ and γ trying to capture?
Chapter focus. Every structural engineer's job — whether the project is a warehouse, a hospital, or a highway bridge — is to make sure the structure carries every load it will ever see with a defensible margin of safety, without over-spending on steel. Designing means balancing five competing considerations at once: safety (nobody gets hurt when the crowd, wind, or earthquake arrives), serviceability (no cracked drywall, no bouncing floors, no doors that jam), economy (the lightest section that still works), constructability (fabricators and erectors can build it), and durability (it survives 50–100 years of weather and use). Safety governs — collapses like Hyatt Regency (Ch 1) are the reason design codes exist and the reason licensure is required to sign drawings.
Two code-legal methods produce those safe designs from the same AISC steel spec:
LRFD (Load and Resistance Factor Design) — factored strength method. Increase the loads by load factors γ (e.g. 1.2 D + 1.6 L), reduce the calculated capacity by a resistance factor φ ≤ 1, and check Ru ≤ φRn. Each factor is calibrated separately to real statistical data (mill reports, occupancy surveys, weather records).
ASD (Allowable Stress Design) — service-load method. Keep the loads unfactored (D + L), divide the capacity by a single overall safety factor Ω ≥ 1 (typically 1.5–2.0), and check Ra ≤ Rn/Ω. Historically the default; still permitted for hand checks and retrofits.
This chapter builds those definitions into a full design method: probabilistic basis, the LRFD inequality, ASCE 7-22 load combinations, and the φ table you will reference in Chapters 4–19.
1. Why LRFD, Not ASD?
AISC 360-22 publishes both methods side by side, and both are code-legal. This course teaches LRFD because every modern U.S. building, bridge, and industrial project is designed that way. Here is the direct comparison.
ASD vs. LRFD design inequalities
(1)
Ra≤Rn/Ω(ASD — service loads, one global safety factor Ω)
Ru≤ϕRn(LRFD — factored loads, split load and resistance factors)
Issue
ASD (Allowable Stress)
LRFD (Load & Resistance Factor)
How is safety applied?
One number Ω hides all uncertainty in the capacity side.
γ scales up each type of load (D vs. L vs. W); φ scales down each type of resistance (yielding vs. rupture vs. bolt).
Does it recognize that dead load is more predictable than live load?
No — D and L are added at their service values, treated equally.
Yes — γD = 1.2 (small, D is well-known) vs. γL = 1.6 (larger, L is more variable).
Does it recognize a brittle failure needs more safety than a ductile one?
Empirical — inherited from 1920s working-stress practice.
Yes — β ≈ 3.0 (members), β ≈ 4.5 (connections). Every φ and γ is back-solved from data.
Economy on live-load-dominated members?
Conservative — treats highly variable L the same as reliable D.
Sharper — larger γL is offset by removing hidden conservatism, so members are typically 5–15% lighter.
Consistency with ACI 318 and ASCE 7?
Poor — ACI abandoned working-stress design in 1971. Load combinations differ from ASCE 7 §2.3.
Full — LRFD combinations in ASCE 7 §2.3 match ACI 318 strength design. One load path for the whole building.
Seismic and wind design?
Requires special ASD combinations (§2.4) that reintroduce factors on E and W anyway.
Native — 1.0W and 1.0E already at strength-level in the LRFD combos.
Which one is the standard in industry today?
Used for quick hand checks, retrofits of pre-2005 buildings, and some petrochemical clients.
The default for essentially all new commercial, institutional, and infrastructure work in the U.S.
Bridge between methods. On the same section, the two safety factors are related by Ω≈1.5/ϕ. Plug in the two most common resistance factors:
Ω from φ — bridge equation
(2)
Ω=ϕ1.5
Ωyielding=0.901.5=1.67
Ωrupture=0.751.5=2.00
When the live-to-dead ratio is around 3 (a typical office), LRFD and ASD pick essentially the same W-shape — but LRFD tells you why that shape works.
Bottom line. LRFD is a rational, probabilistically calibrated, code-aligned method. ASD is a legacy method preserved for continuity. If you can only master one — master LRFD.
2. Probabilistic Basis
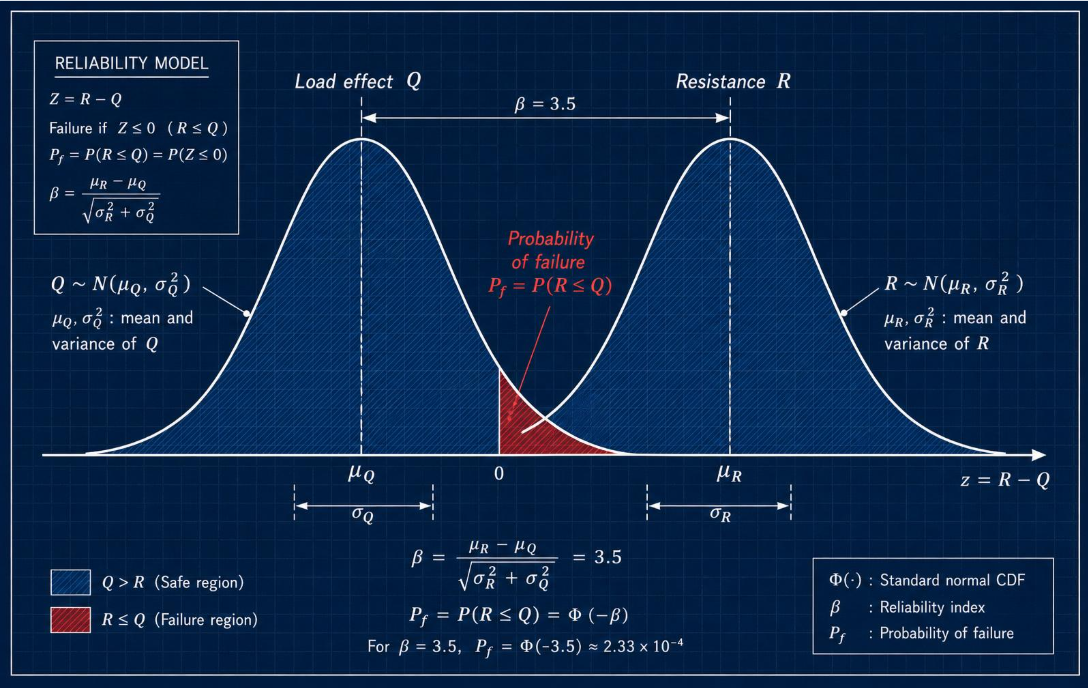
LRFD calibrates φ and γ so the failure-region overlap area gives a target reliability index β ≈ 3.0 (members) and β ≈ 4.5 (connections).
Plain-language version. Nothing in a real building is a single fixed number. Think of a typical office floor beam:
The load Q is uncertain. The dead load depends on how thick the concrete slab actually gets poured, what ceiling and MEP the tenant installs, and whether partitions are moved. The live load depends on the occupants — a light office one year could become a filing archive the next. We don't know these numbers exactly; we know a range. Statisticians represent that range as the blue "Load Q" bell curve.
The resistance R is also uncertain. Mill-rolled A992 steel is specified as Fy = 50 ksi, but a coupon test typically measures 55–58 ksi. The web thickness of a W18×35 is nominally 0.300 in but ships anywhere from 0.290 to 0.315 in. Fabrication tolerances shift the true capacity a few percent. That range is the green "Resistance R" bell curve.
Failure is the overlap. A beam fails when a specific load draw is bigger than that beam's specific capacity — i.e., a value from the right tail of Q lands past a value in the left tail of R. That is the shaded overlap region in the figure.
What LRFD actually does. The code picks the load factors γ (which push the design load up to the right tail of Q) and the resistance factors φ (which pull the design capacity down to the left tail of R) so the two tails almost never overlap. The remaining probability of failure is expressed as a reliability index β. Larger β = safer.
(3)
CalibrationTarget
β≈3.0 for members ⇒ probability of failure
Pf=Φ(−β)=Φ(−3.0)≈1.35×10⁻³ — about
1 in 1,000 over the 50-year design life.
β≈4.5 for connections ⇒
Pf=Φ(−4.5)≈3.4×10⁻⁶ — about
3 in 1,000,000.
How Pf is obtained. Define the safety margin
Z=R−Q. Under the LRFD reliability model both R and Q
are treated as normal random variables, so Z is also normal with
mean μZ=μR−μQ and standard deviation
σZ=σR2+σQ2. Failure means
Z≤0, i.e. resistance is exhausted by the load effect:
Pf=P(Z≤0)=Φ(σZ0−μZ)=Φ(−β),β=σR2+σQ2μR−μQ
where Φ(⋅) is the standard normal CDF. AISC back-solves the
ϕ and γ factors so that the resulting β hits
the target above for every limit state in the Specification.
Why connections get a higher β (and therefore a smaller φ). A single beam has redundancy — the slab, adjacent beams, and neighboring bays can help redistribute load if it starts to yield. A connection has no redundancy: if the bolts shear or the weld cracks, the beam falls. So AISC calibrates φbolt = 0.75 and φrupture = 0.75, versus φyielding = 0.90 and φbending = 0.90 for members. The Hyatt Regency 1981 and FIU 2018 collapses (Chapter 1) are exactly why this asymmetry exists.
Quick numerical feel — W18×35 floor beam (Fy = 50 ksi, Zx = 66.5 in³). A concrete example of how LRFD absorbs both material and load surprises without over-designing.
Rn — nominal strength computed from AISC provisions using nominal material and section properties.
φ — resistance factor (≤ 1.0) that penalizes the calculated capacity for the uncertainty of the limit state.
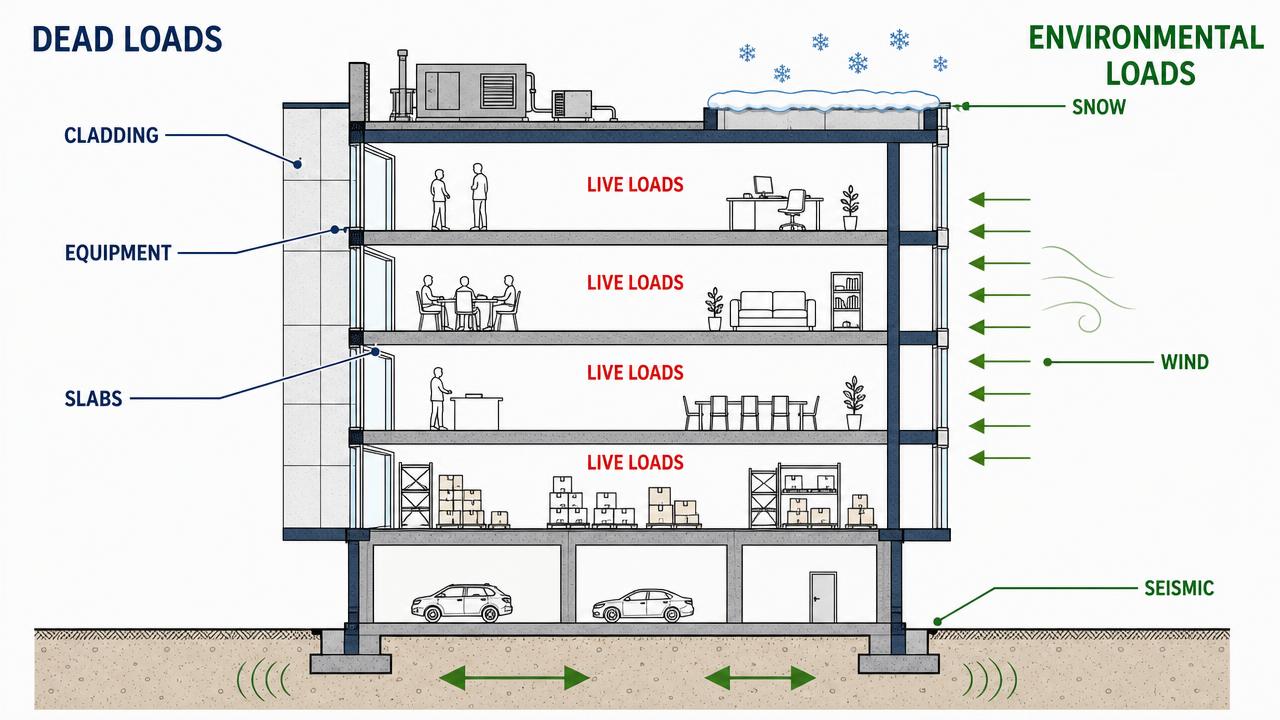
3A. Loads and Actions
The three families of actions on a building: permanent (dead), variable (live) and environmental (wind, snow, seismic).
An action is anything that causes stress, strain or displacement in a structure. Before a single member can be sized you must know every action, its magnitude, and how likely it is to occur at the same time as the others. ASCE 7-22 is the standard that answers all three questions.
Permanent actions — dead load, D
Self-weight of the structural frame, slab and deck; superimposed finishes, ceilings, partitions, cladding and fixed MEP equipment.
Computed from geometry and unit weights: steel 490 pcf, normal-weight concrete 150 pcf, lightweight concrete 110–120 pcf.
Well known, so its load factor is small (γD = 1.2) — and deliberately reduced to 0.9 in the uplift combinations where dead load is the stabilising action.
Variable actions — live load, L and Lr
Occupancy loads from ASCE 7-22 Table 4.3-1: offices 50 psf (plus 15 psf partition allowance), corridors above the first floor 80 psf, classrooms 40 psf, assembly with fixed seats 60 psf, light storage 125 psf.
Roof live load Lr covers maintenance access, typically 20 psf reduced by the R1R2 factors of §4.8.2.
Live-load reduction (§4.7): L = Lo(0.25 + 15/√(KLLAT)). The larger the tributary area, the less likely it is to be fully loaded everywhere at once. Never reduce below 0.50Lo for members supporting one floor, or 0.40Lo for multiple floors.
Highly variable, so γL = 1.6 — a third larger than the dead-load factor.
Environmental actions — S, W, E
Snow, S (Ch. 7): pf = 0.7 Ce Ct Is pg, then drift and sliding surcharges at parapets and roof steps — drifts, not the flat load, cause most snow failures.
Wind, W (Ch. 26–30): qz = 0.00256 KzKztKdKeV², applied as pressure on the main wind-force resisting system and, at higher local values, on components and cladding. Wind governs uplift on light roofs and drift on tall frames.
Seismic, E (Ch. 11–12): V = CsW with Cs = SDS/(R/Ie). Note the inertial nature: seismic demand is proportional to mass, so making a building heavier makes the earthquake worse.
Both W and E enter the LRFD combinations at a factor of 1.0 because their mapped values are already strength-level events.
Other actions you must not forget
Rain, R: ponding on flat roofs is a progressive instability — deflection admits more water, which increases deflection.
Lateral earth and fluid pressure, H and F: basement and retaining walls.
Restrained thermal, shrinkage and settlement effects, T: only structurally significant when movement is restrained.
Construction and erection loads: often the worst case a member ever sees, before the diaphragm and bracing exist.
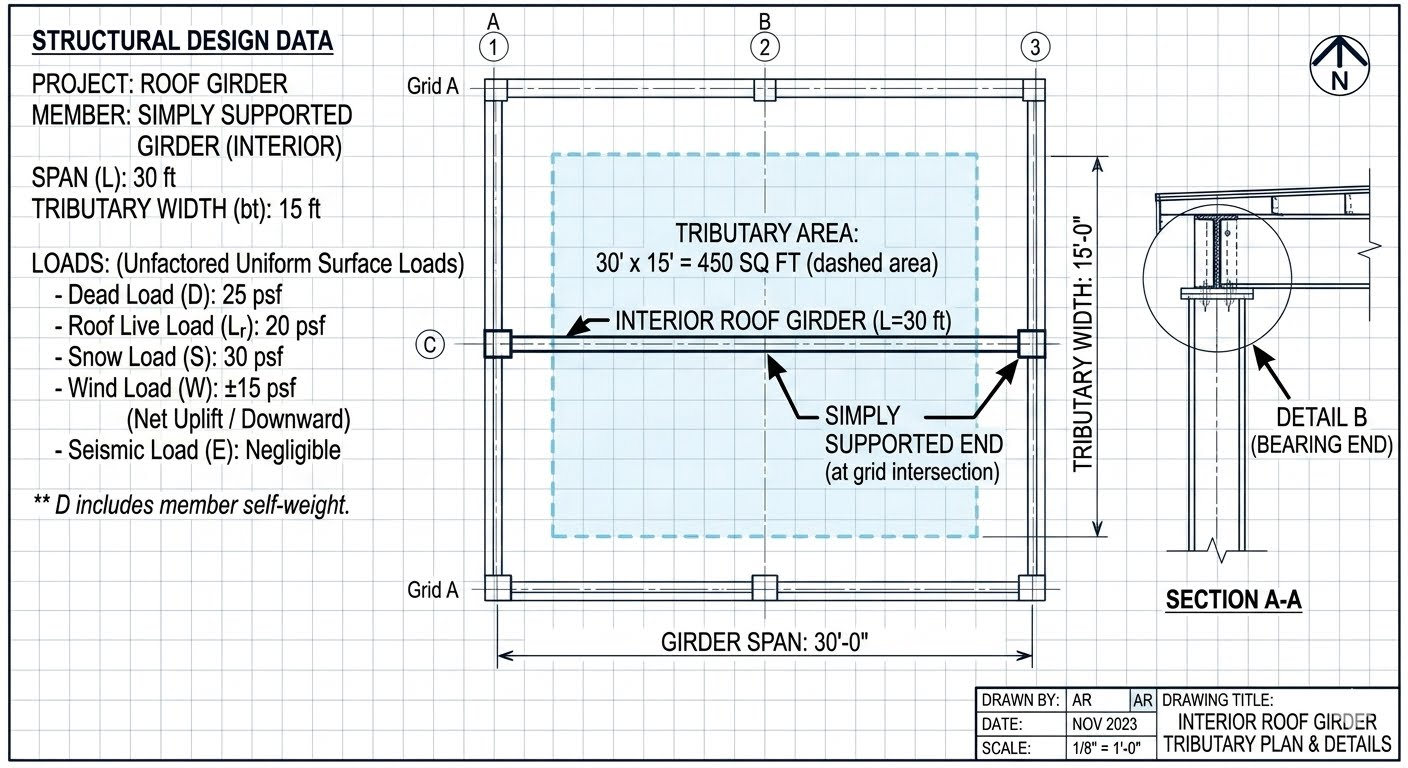
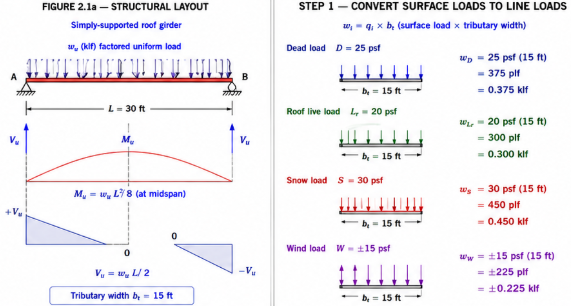
Tributary thinking. Loads are given as pressures (psf) but members are designed with line loads (klf) and point loads (kips). w = q × tributary width, and P = q × tributary area. Getting the tributary geometry right is the single most common source of error in the load takeoff.
3B. Design Philosophies and Limit States
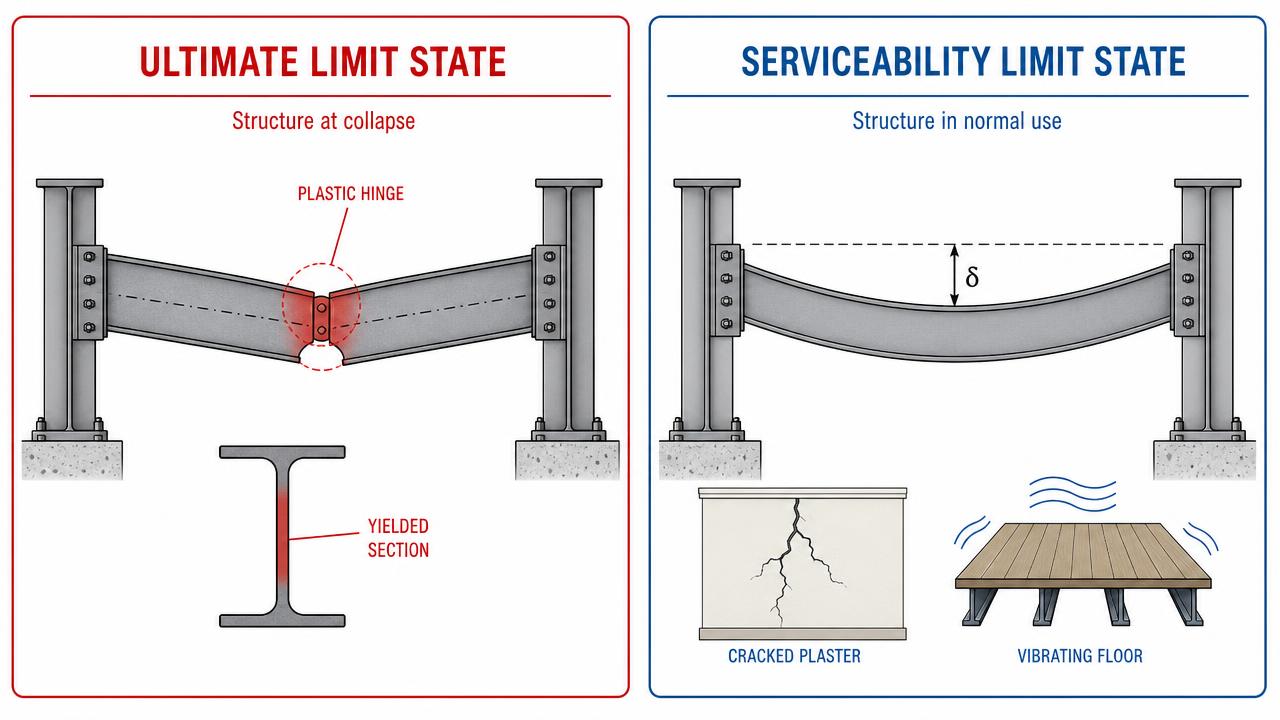
Strength limit states protect life; serviceability limit states protect function, finishes and comfort.
A limit state is a condition beyond which the structure no longer fulfils an intended function. Design consists of identifying every applicable limit state and demonstrating that the demand stays on the safe side of each one.
Strength (ultimate) limit states — yielding, rupture, buckling, sliding, overturning, connection failure. Checked with factored loads: Ru ≤ φRn. Exceeding one risks lives, so the margin is large.
Serviceability limit states — deflection (L/360 live, L/240 total), lateral drift (H/400 to H/500 under wind), floor vibration (AISC Design Guide 11), and permanent cracking or damage to finishes. Checked with unfactored service loads, because these are everyday conditions.
Do not mix the two. Applying factored loads to a deflection check produces an absurdly heavy beam; applying service loads to a strength check is unsafe.
3C. Structural Idealization
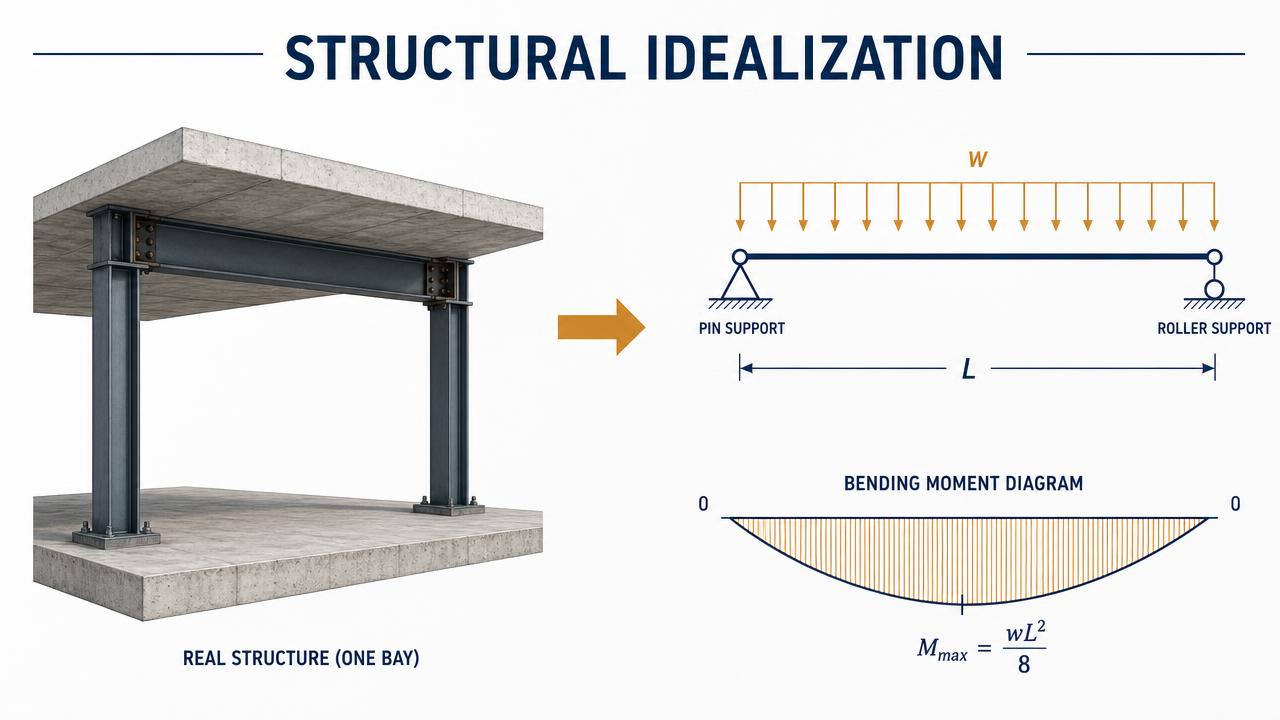
From a real bay to an analysable model: geometry becomes a line, the floor becomes w, and the connections become supports.
No one analyses a building as it is actually built. Engineers replace it with an idealized model that is simple enough to solve and conservative enough to trust. Four decisions define that model:
Geometry. Members become lines along their centroidal axes; spans are measured centre-to-centre of supports.
Supports and connections. A shear tab is idealized as a pin, a fully welded moment connection as fixed, and a bearing seat as a roller. Real joints are partially restrained — the idealization must err toward the conservative demand.
Loads. Surface pressures become a uniform line load w over the tributary width, and beam reactions become point loads on the girder.
Material behaviour. Linear-elastic analysis for demands, with plastic section capacity for resistance — the standard combination in AISC 360-22.
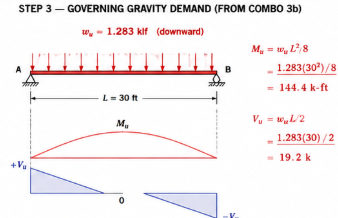
For the simply supported case in the figure the resulting demands are the two expressions used repeatedly throughout this course:
Simply supported beam under a uniform load
(9)
Mmax=8wL2
Vmax=2wL
Δmax=384EI5wL4
Sanity rule. Every idealization must be checked against reality. If you model a connection as a pin, the detail you draw must actually be able to rotate; if you model it as fixed, the connection must be designed for the moment your model reports.
4. ASCE 7-22 LRFD Combinations (§2.3.1)
Combo
Expression
Governs when…
1
1.4 D
Very heavy dead load, minimal live/environmental.
2
1.2 D + 1.6 L + 0.5 (Lr or S or R)
Typical office / gravity check.
3
1.2 D + 1.6 (Lr or S or R) + (1.0 L or 0.5 W)
Roof / snow-controlled.
4
1.2 D + 1.0 W + 1.0 L + 0.5 (Lr or S or R)
Wind + gravity.
5
1.2 D + 1.0 E + 1.0 L + 0.2 S
Seismic + gravity.
6
0.9 D + 1.0 W
Overturning / uplift — wind.
7
0.9 D + 1.0 E
Overturning / uplift — seismic.
Companion action: L = 0.5 kip/ft² is used only when unfactored L < 100 psf and the occupancy is not garage/assembly (ASCE 7-22 §2.3.1, Exception).
5. Common Resistance Factors φ
Limit state
φ
AISC ref
Tension — yielding on Ag
0.90
§D2(a)
Tension — rupture on Ae
0.75
§D2(b)
Compression
0.90
§E1
Flexure
0.90
§F1
Shear (h/tw ≤ 2.24√E/Fy)
1.00
§G2.1(a)
Bolt shear / bearing / tearout
0.75
§J3
Fillet weld
0.75
§J2.4
6. Safety Factor vs Resistance Factor — Practical Difference
Why safety factors exist at all — the practical story. Nothing you build is ever exactly what the drawings say. Steel comes in slightly heavier or lighter than nominal. Concrete cures a bit weaker on a rainy day. Occupancy loads change when a tenant swaps a call center for a filing archive. Wind gusts arrive from directions the code did not model. Safety factors are the code's way of forcing a margin between what you compute and what could actually happen — without requiring the engineer to become a statistician for every project.
A safety factor is a single scalar > 1 that inflates the demand (or deflates the capacity). It rolls together every source of uncertainty — load variability, material variability, workmanship, analysis simplifications — into one number. Historically Allowable Stress Design (ASD) used one big factor of safety Ω (typically 1.5–2.0) applied to Rn: Ra ≤ Rn/Ω. Every uncertainty was averaged into that single Ω, even though live load is genuinely more variable than dead load and steel is more predictable than concrete.
Resistance factors are what LRFD replaced the single safety factor with. Instead of one number for the whole design, LRFD splits the safety into two families:
Load factor γ (ASCE 7)
Resistance factor φ (AISC 360)
What it modifies
The applied load (D, L, W, E, S, R)
The computed capacity (Rn)
Direction
> 1.0 — pushes design load up
< 1.0 — pulls design capacity down
Tuned to
Variability of that load type
Variability & consequence of that failure mode
Examples
1.2 D (well-known), 1.6 L (more variable), 1.0 W (mapped design wind)
Why splitting matters — a practical example. A member has D = 100 kip, L = 40 kip, Rn = 220 kip. Under the old single-factor ASD approach (Ω = 1.67): capacity allowed = 220/1.67 = 132 kip > 140 kip demand? Fails. Under LRFD: Ru = 1.2·100 + 1.6·40 = 184 kip; φRn = 0.90·220 = 198 kip > 184 kip Passes, with a defensible reliability index β. LRFD "found" capacity because the dead load piece is charged a lighter 1.2× (concrete-weight variability is small) while the live-load piece is charged a heavier 1.6× (occupancy is genuinely uncertain). ASD's one-size-fits-all Ω over-penalized the well-known dead load.
Bottom line for the field. Resistance factors are calibrated, not arbitrary. AISC ran Monte-Carlo simulations against real mill data, real load surveys, and real failure statistics to pick φ so the resulting probability of failure is the same across every limit state. A safety factor Ω (still permitted for ASD in AISC 360 §B3.2 via Ω = 1.5/φ) is derived from φ — the code's math starts with resistance factors, not with a global safety number.
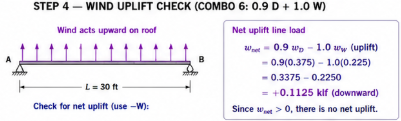
Combo 6 is the wind-uplift check. Use the uplift sign of wind (W acts upward, so it enters with a negative sign against gravity). The net line load is:
Net uplift line load — Combo 6
(4)
wnet=0.9wD−1.0wW
wnet=0.9(0.375klf)−1.0(0.225klf)
wnet=0.3375−0.2250
wnet=+0.1125klf(downward)
The sign convention: uplift occurs ifwnet<0. Here wnet=+0.113klf>0, so gravity from the reduced dead load still exceeds the wind suction — no net uplift.
Figure 2.1e — Step 4: Combo 6 net line load = +0.1125 klf downward → no net uplift
Step 5 — Anchor uplift reaction
End reaction — Combo 6
(5)
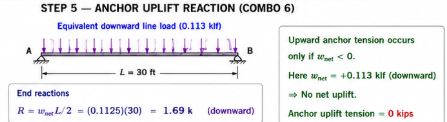
R=2wnetL
R=2(0.1125klf)(30ft)
R=+1.69kips (downward)
⇒0kips tension in anchors
No wind-uplift tension develops in the anchors under Combo 6 for this girder. Anchor design is governed by the seismic or gravity envelope, not by wind uplift.
Figure 2.1f — Step 5: end reaction R = 1.69 k downward ⇒ 0 kips anchor uplift tension
Reflection: Snow governed here (Combo 3b) because S > Lr and W was modest. In a hurricane-prone region the wind-uplift combo (0.9 D − 1.0 W) frequently governs the anchor design even when the gravity envelope is snow-controlled.
Worked Example 2.2 — Gravity Column Pu Envelope (3-Story Interior Column)
Given
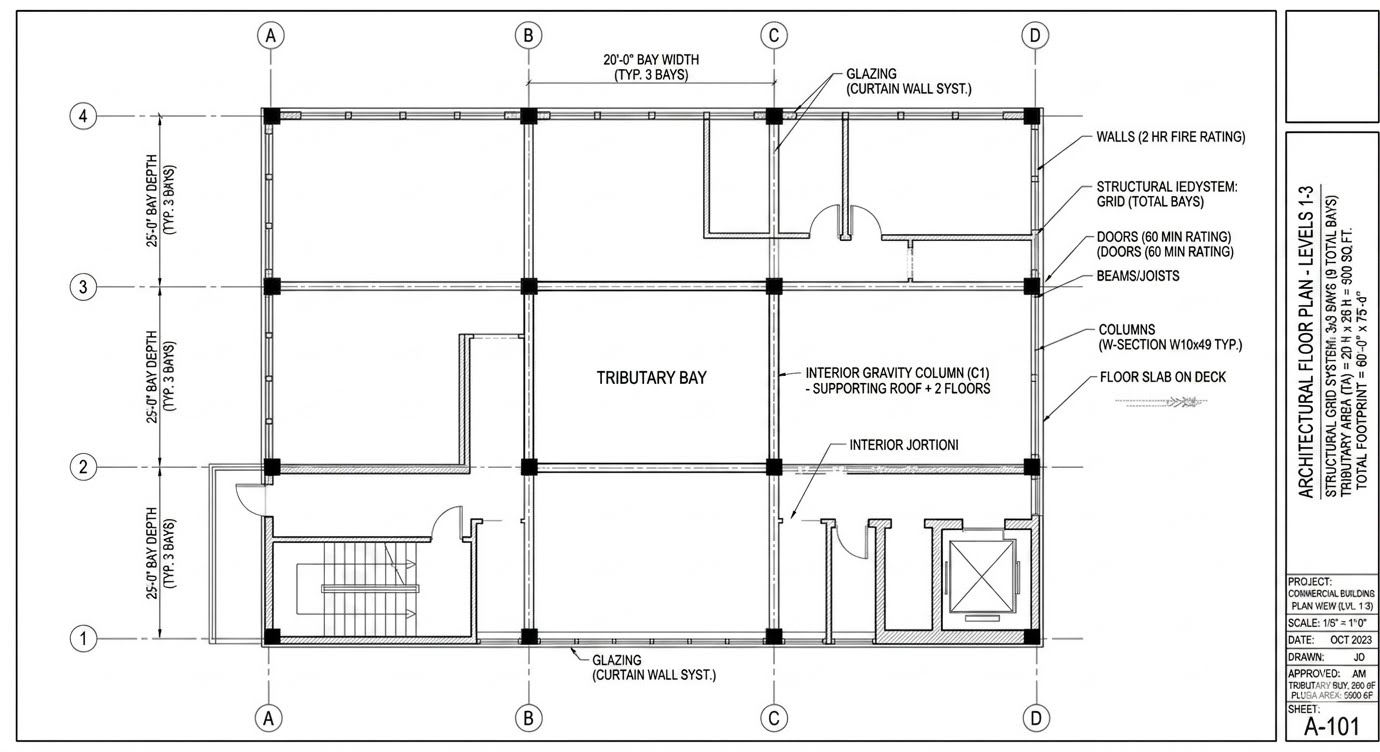
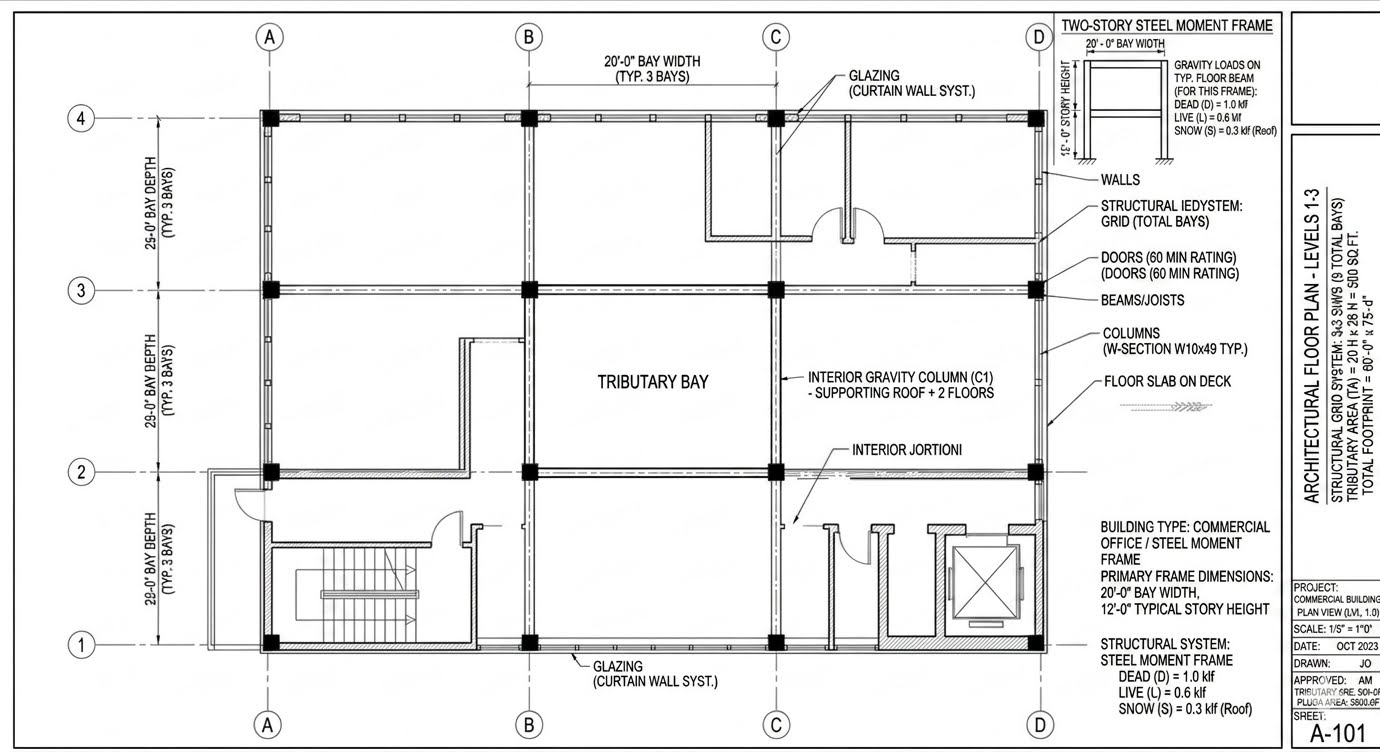
Interior gravity column supporting a roof + 2 floors. Tributary bay 20 ft × 25 ft = 500 ft² per level.
Unfactored surface loads: floors D = 80 psf, L = 60 psf; roof D = 20 psf, Lr = 20 psf, S = 25 psf.
Column self-weight and cladding lumped into D. No seismic or wind on this interior column.
Required
Compute the cumulative service axial loads (PD, PL, PLr, PS) at the base of the interior column.
Evaluate all applicable ASCE 7-22 §2.3.1 LRFD combinations and determine the governing factored axial demand Pu for design of the column and its base plate.
Figure 2.2 — Problem statement: architectural floor plan, interior column C1 (W10×49) with 20 ft × 25 ft tributary bay
Figure 2.2a — Schematic: 3-story stack with tributary bay per level
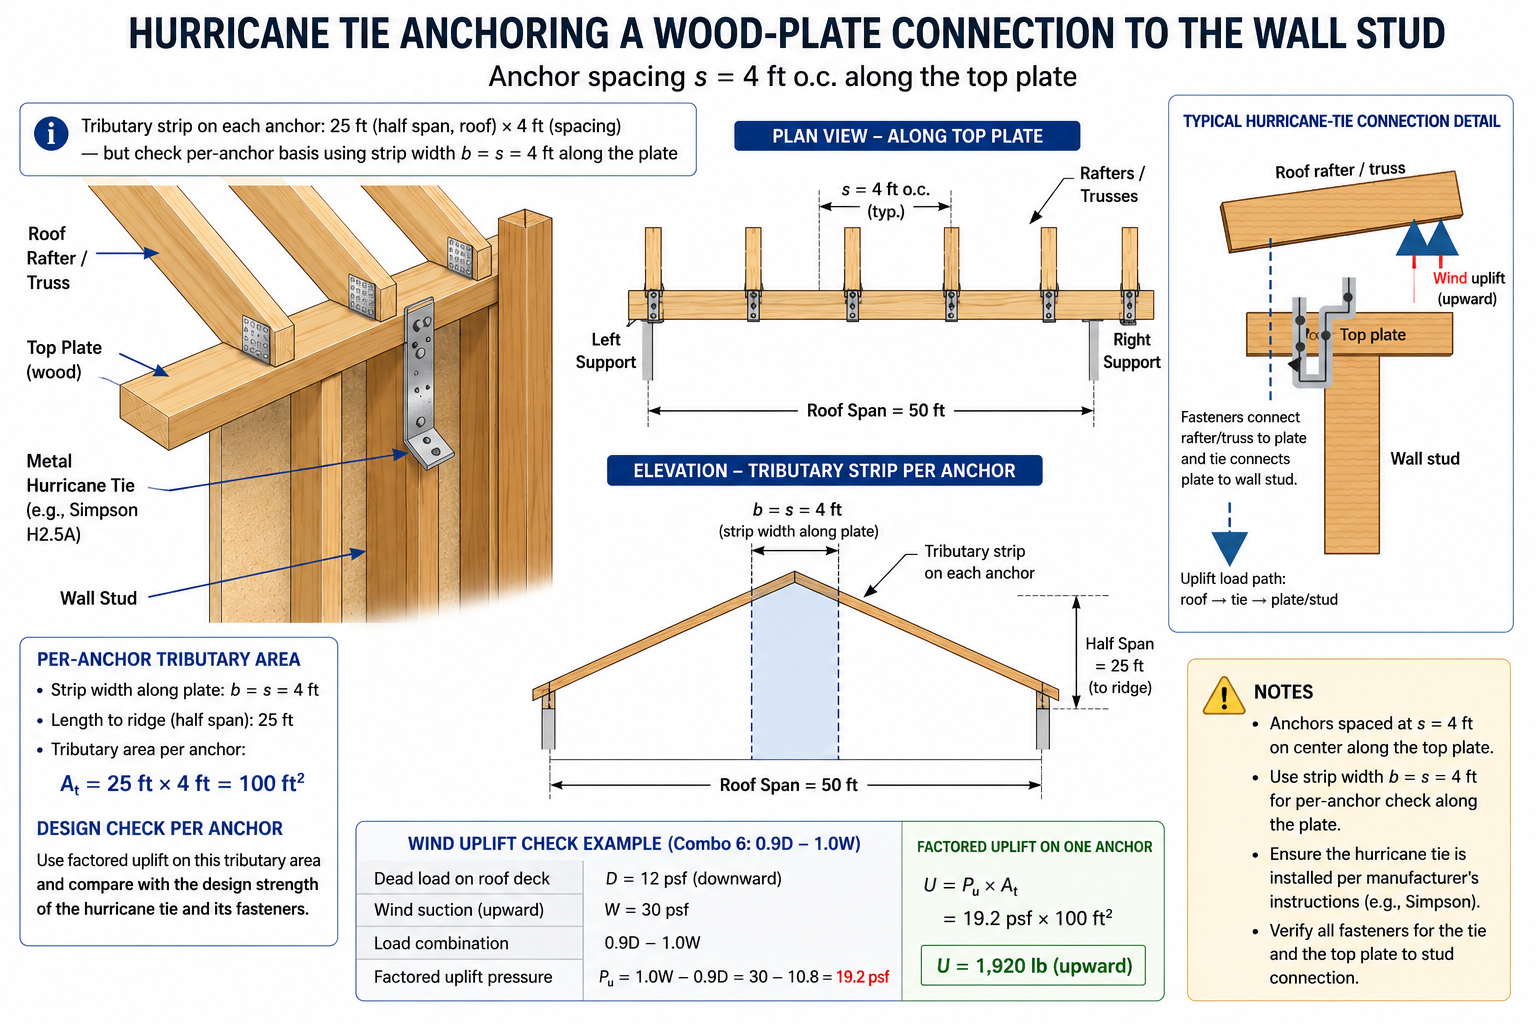
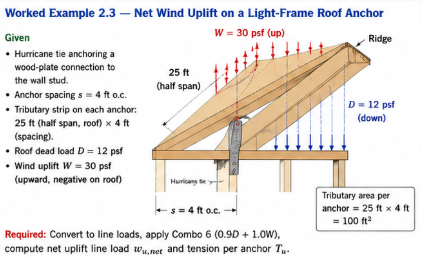
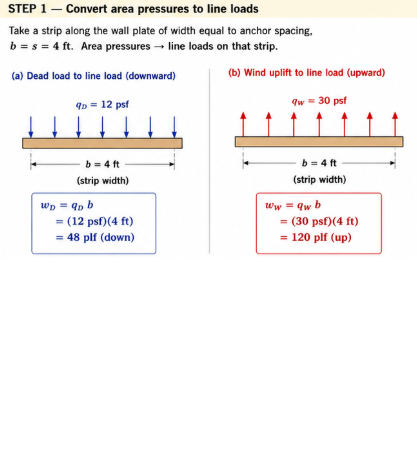
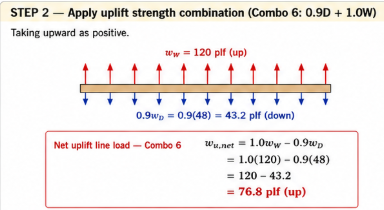
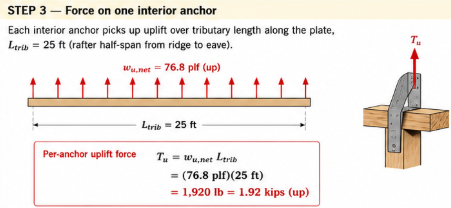
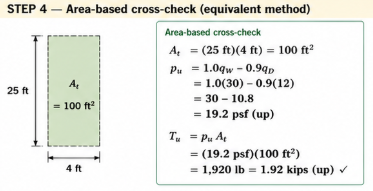
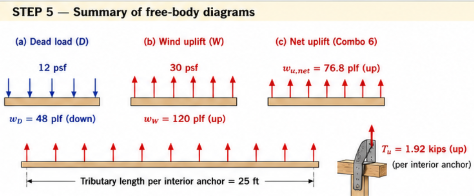
Free-body summary of the three load states — dead load (D), wind uplift (W), and net uplift (Combo 6) — collapsing to the per-anchor tension demand.
Design uplift per interior anchor Tu = 1.92 kips (Combo 6 governs). Select a hurricane tie rated ≥ 1,920 lb factored tension (e.g., Simpson H10A or heavier).
Reflection: Combo 6 (0.9 D + 1.0 W) is the uplift envelope because it deliberately reduces the stabilising dead load by 10%. This is not a safety margin trick — it acknowledges that D can be lower than nominal (e.g., during construction before finishes are installed) when a design-level wind event might strike.
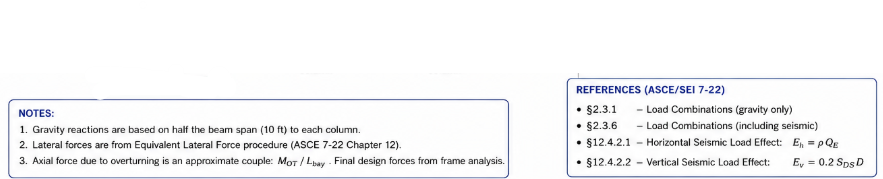
Assemble the seismic load effect E = Eh + Ev per ASCE 7-22 §12.4.2.
Compute the seismic overturning moment MOT and the resulting axial PE in the leeward column from the overturning couple.
Apply the ASCE 7-22 §2.3.6 seismic LRFD combination (1.2 D + E + L + 0.2 S) and determine the factored column axial Pu.
Compare against the gravity-only LRFD envelope (§2.3.1) and identify the governing combination.
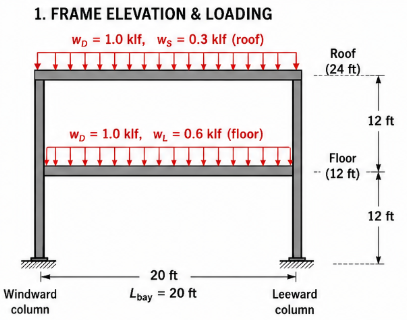
Figure 2.4 — Problem statement: architectural floor plan with two-story steel moment frame elevation, 20 ft bay × 12 ft story height, gravity loads D/L/S
Step 1 — Determine the Seismic Load Effect
ASCE/SEI 7-22 §12.4.2 splits the seismic load effect into horizontal and vertical components: E = Eh + Ev, where Eh = ρQE (§12.4.2.1) and Ev = 0.2 SDS D (§12.4.2.2).
Seismic load effect — ASCE 7-22 §12.4.2
(14)
E=Eh+Ev
Eh=ρQE=(1.0)QE=QE
0.2SDS=0.2(0.30)=0.06
Ev=0.2SDSD=0.06D
Figure 2.4a — Frame elevation and gravity loading (Step 1)
Step 2 — Gravity Axial at the Leeward Column
Each column supports one-half of the beam gravity load. Tributary reaction length = Lbay/2 = 10 ft. Dead acts at both levels; live only at the floor; snow only at the roof.
Dead-load axial (both levels)
(15)
PD=wD(2Lbay)nlevels
PD=(1.0)(10)(2)
PD=20kips
Floor live axial
(16)
PL=wL(2Lbay)
PL=(0.6)(10)
PL=6kips
Roof snow axial
(17)
PS=wS(2Lbay)
PS=(0.3)(10)
PS=3kips
Figure 2.4b — Tributary gravity loads on each column (Step 2)
Step 3 — Seismic Overturning Moment
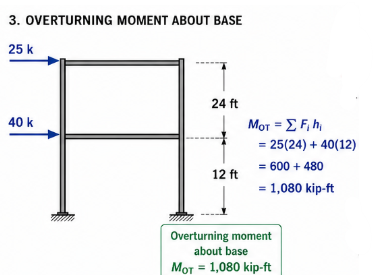
The ELF procedure (ASCE 7-22 §12.8) delivers lateral forces at each diaphragm. Overturning about the base is MOT = Σ Fi hi.
Overturning moment — ASCE 7-22 §12.8
(18)
MOT=∑Fihi
MOT=25(24)+40(12)
MOT=600+480
MOT=1,080kip-ft
Story-shear cross-check
(19)
V2=25k
V1=25+40=65k
MOT=V2(12)+V1(12)
MOT=25(12)+65(12)=1,080kip-ft✓
Figure 2.4c — Overturning moment about the base (Step 3)
Step 4 — Approximate Column Axial from Overturning
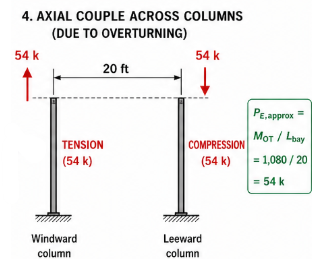
For a preliminary hand check, assume the overturning is resisted by an equal compression-tension couple across the two columns.
Engineering note: This is an equilibrium approximation for preliminary design. The final axial should come from full frame analysis including beam-column stiffness, joint continuity, base restraint, and second-order (P-Δ) effects.
Figure 2.4d — Axial couple across columns (Step 4)
Step 5 — Apply the LRFD Seismic Load Combination
ASCE/SEI 7-22 §2.3.6 governing seismic strength combination: U = 1.2D + E + L + 0.2S. Substituting E = QE + 0.06 D collapses the D coefficient to 1.26.
Seismic LRFD combination — ASCE 7-22 §2.3.6
(21)
U=1.2D+E+L+0.2S
E=QE+0.06D
U=1.2D+0.06D+QE+L+0.2S
U=1.26D+QE+L+0.2S
Factored axial on the leeward column
(22)
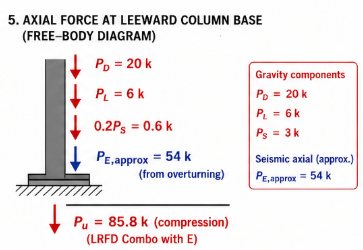
Pu=1.26PD+PE,approx+PL+0.2PS
Pu=1.26(20)+54+6+0.2(3)
Pu=25.2+54+6+0.6
Pu=85.8kips
Figure 2.4e — Free-body of the leeward column base (Step 5)
Step 6 — Compare with the Gravity-Only LRFD Combination
The seismic LRFD load combination governs the design of the leeward column: Pu = 85.8 kips (seismic) vs. Pu,g = 35.1 kips (gravity-only) — a 144% increase over the governing gravity envelope.
Reflection: On the windward column, ρPE reverses sign, so the counter combination (0.9 − 0.2 SDS) D + ρE frequently produces net uplift — a tension design case that gravity combos never reveal. Every column of every moment-frame line must be envelope-checked in both directions.
Worked Example 2.5 — ASD vs. LRFD on the Same Floor Beam
Given
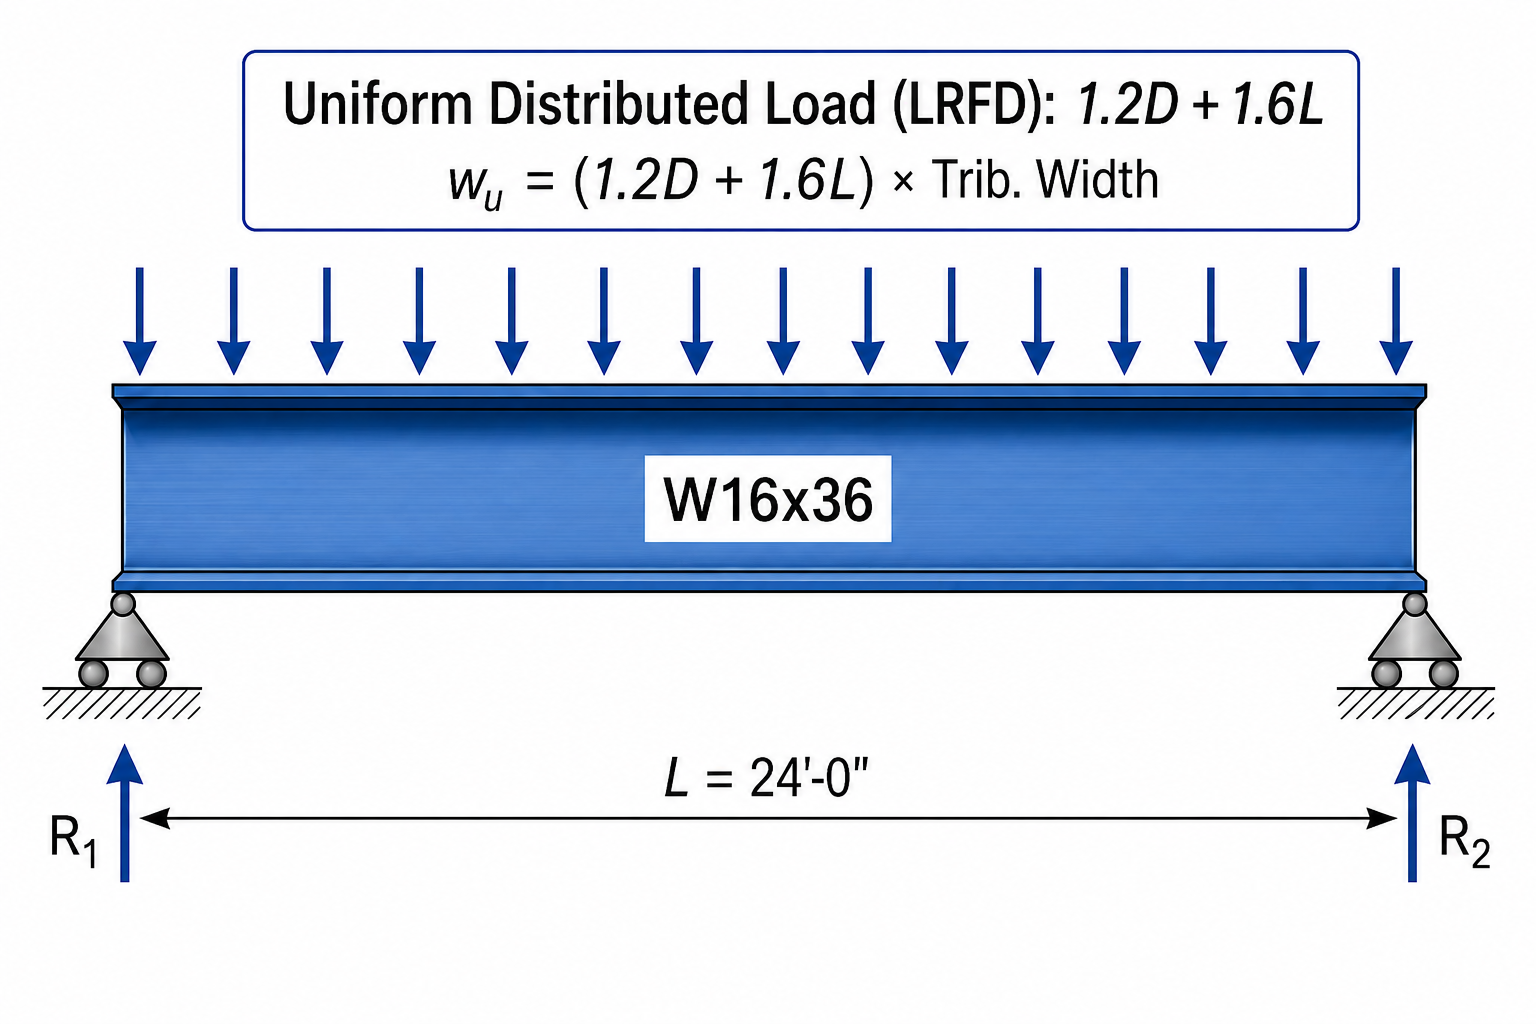
Simply-supported W16×36 floor beam, L = 24 ft, tributary width 8 ft.
Loads: D = 60 psf, L = 80 psf (office). No snow, wind, or seismic on this interior beam.
Compute the governing LRFD factored moment Mu and verify the AISC 360-22 Eq. B3-1 inequality Mu ≤ φb Mn.
Compute the ASD service moment Ma and verify the §B3.2 inequality Ma ≤ Mn/Ωb.
Report the demand-to-capacity ratios for both methods and comment on which is more economical for this L/D ratio.
Figure 2.5 — Problem statement: W16×36 simply-supported floor beam, L = 24 ft, tributary width 8 ft, D = 60 psf, L = 80 psf (office)
Figure 2.5a — Side-by-side ASD vs. LRFD inequalities on the same nominal capacity
Step 1 — Line loads
Convert surface load to line load
(25)
wD=60⋅8=480plf=0.48klf
wL=80⋅8=640plf=0.64klf
Step 2 — LRFD demand and check
LRFD Combo 2 — factored line load
(26)
wu=1.2wD+1.6wL
wu=1.2(0.48)+1.6(0.64)
wu=0.576+1.024
wu=1.60klf
Factored midspan moment
(27)
Mu=8wuL2
Mu=81.60(24)2
Mu=81.60(576)
Mu=115.2kip-ft
LRFD design inequality — AISC 360-22 Eq. B3-1
(28)
Mu≤ϕbMn
115.2≤0.90(267)
115.2≤240.3kip-ft✓
Step 3 — ASD demand and check
ASD — service line load, no factoring
(29)
wa=wD+wL
wa=0.48+0.64
wa=1.12klf
Service midspan moment
(30)
Ma=8waL2
Ma=81.12(576)
Ma=80.6kip-ft
ASD design inequality — AISC 360-22 §B3.2
(31)
Ma≤ΩbMn
80.6≤1.67267
80.6≤159.9kip-ft✓
Step 4 — Demand-to-capacity ratios (both methods must agree)
Unity checks
(32)
DCRLRFD=ϕbMnMu=240.3115.2=0.480
DCRASD=Mn/ΩbMa=159.980.6=0.504
Both methods deliver near-identical utilization (≈ 0.48–0.50) — as intended by the AISC calibration Ω = 1.5/φ. LRFD "wins" here by ~5% because 1.2 D is charged less heavily than the effective 1.5×D that ASD implicitly applies to the well-known dead load piece.
Reflection: When L/D ≈ 3 (typical office), LRFD and ASD are within ~5%. As L/D rises (heavy live loads, warehouses) LRFD becomes noticeably more economical because the 1.6 factor is still less than the 1.67 Ω lumped on everything. As L/D falls (heavy dead — a masonry-clad building), ASD becomes slightly more economical.
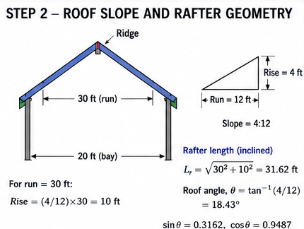
Worked Example 2.6 — LRFD Load Distribution from an Inclined Gable Roof to Roof Rafters and Supporting Beams
Given
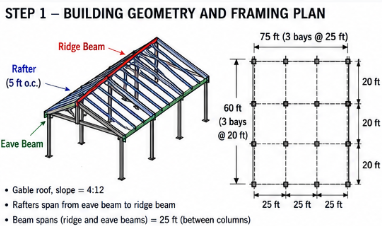
3-bay × 3-bay steel building; plan 60 ft × 75 ft (three 20-ft transverse bays × three 25-ft longitudinal bays).
Gable roof, slope 4:12; ridge runs in the 75-ft direction; eave-to-ridge horizontal run = 30 ft.
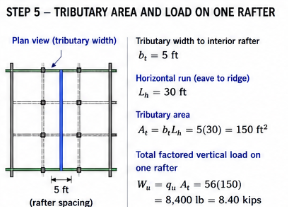
Rafters spaced s = 5 ft o.c., spanning eave beam → ridge beam. Ridge and eave beams span Lb = 25 ft between columns.
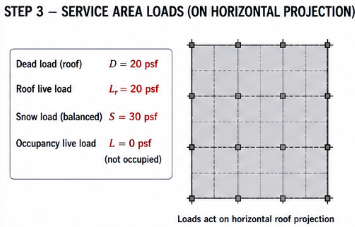
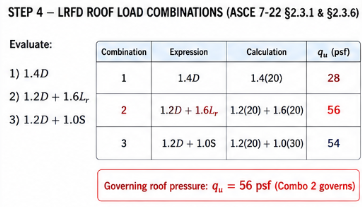
Service loads (on horizontal projection): D = 20 psf, Lr = 20 psf, S = 30 psf (balanced), L = 0 psf (unoccupied roof) — ASCE/SEI 7-22.
Required
Governing LRFD factored roof pressure qu among ASCE 7-22 combinations 1, 2 and 3.
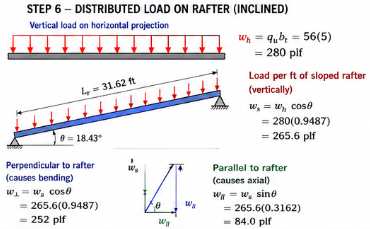
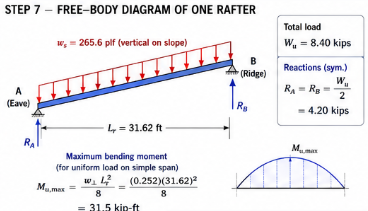
Tributary load, sloped line load, perpendicular/parallel components, reactions, and Mu,max for a typical rafter.
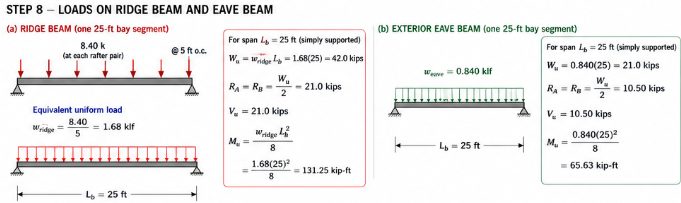
Factored line load wu, shear Vu, and moment Mu for one 25-ft segment of the ridge beam and the exterior eave beam.
Step 1 — Roof geometry and framing arrangement
Plan dimensions
(33)
Transverse=3(20)=60ft
Longitudinal=3(25)=75ft
∴Roof plan=60ft×75ft
Figure 2.6a — Building geometry and framing plan (Step 1)
Step 2 — Service-level area loads on horizontal projection
Roof service loads (unoccupied)
(34)
D=20psf
Lr=20psf
S=30psf
L=0psf
Loads are specified on the horizontal roof projection, so tributary-area calculations use horizontal dimensions.
Figure 2.6b — Service area loads on horizontal projection (Step 2)
Step 3 — Inclined rafter length and roof angle
Rise from run and slope 4:12
(35)
rise=30(124)
rise=10ft
Inclined rafter length
(36)
Lr=302+102
Lr=1,000
Lr=31.62ft
Roof angle and direction cosines
(37)
θ=tan−1(124)=18.43∘
cosθ=31.6230=0.9487
sinθ=31.6210=0.3162
Figure 2.6c — Roof slope and rafter geometry (Step 3)
Reflection: Loads on horizontal projection convert to sloped line loads by ws = wh cos θ; the perpendicular component w⊥ = ws cos θ = wh cos²θ governs bending. Because Mu = w⊥ Lr²/8 = wh Lh²/8 (identically), you may design a symmetric gable rafter on its horizontal projection and still get the correct bending demand. Roof live-load reduction, unbalanced/drift snow, wind uplift (Combo 6), rain-on-snow, and ponding must also be evaluated in real design.
06
Professional practice, safety & ethics
Reliability in practice
Professional practice
•Load combinations are jurisdictional: confirm the adopted ASCE 7 edition (7-16 vs 7-22) before generating combos — roof live and snow provisions changed.
•Record the governing combination for each member in the calculation package; reviewers check the envelope, not one load case.
•Keep ASD and LRFD results separate — mixing them within one member check is a common submittal rejection.
Safety in design & construction
•φ and Ω exist because loads and resistance are random; do not 'borrow' reserve by rounding demand down.
•Construction-phase loads (wet concrete, stacked material, pump trucks) frequently exceed service live load — check them explicitly.
•Flag any member with a demand/capacity ratio above 1.00 immediately; there is no acceptable 'slight' overstress.
Engineering ethics
•Do not tune load factors or importance factors to make a member work — that transfers risk to the occupant.
•Disclose to the client when an existing structure is under-capacity, in writing (NSPE II.1.a).
•Calculations must be reproducible by another engineer; hidden spreadsheet overrides are an ethical failure.
Erection safety: OSHA Subpart R fall protection and stable temporary bracing.Peer review and the engineer's seal: responsible charge and standard of care.
ABET / licensure link. These points map to ABET Student Outcomes 2 and 4 — engineering design within realistic constraints, and recognition of ethical and professional responsibilities. Expect NCEES FE and PE exam questions on the NSPE Code of Ethics, OSHA construction requirements, and the engineer's standard of care.
07
Cost analysis
Cost of conservatism
Approach
•Every load factor and φ you apply has a price: quantify what an extra 10% design demand costs in tonnage before adding ‘safety’ informally.
•Compare governing combinations — designing for a non-governing combo silently inflates the whole frame.
•Optimization pays off on repeated members (typical bay), not on one-off members.
Worked cost example — Cost of a 10% demand increase across 60 beams
Basis: Typical floor framing bay, 1.2D+1.6L governing
Line item
Qty
Rate
Cost
Baseline beam weight
60 beams @ 1,050 lb
$0
$0
Added steel from +10% demand
3.15 ton
$2,700
$8,505
Extra shop handling
6 hr
$95
$570
Design re-check labor
8 hr
$145
$1,160
Estimated total
$10,235
Takeaway. A casual 10% over-design on one typical bay type costs roughly $10k — real money for zero code benefit.
Unit rates are representative US averages for teaching purposes. On a real project, price with current local rates (RSMeans, fabricator quotes, or contractor pricing) and state the estimate date.
08
Animated concepts
Key mechanics visualised — watch the strain profile, stress block, or buckled shape evolve
LRFD load combinations
Bars grow as each ASCE 7 combination is evaluated. The governing combo (orange) drives the demand Ru.
09
Engineering figures
Full-page reference diagrams — the visual vocabulary you will use for the rest of the course
§2.6.1
LRFD in the field
Fig. 2.1Engineers reviewing factored loads
Design decisions are made against Ru from ASCE 7.
§2.6.2
Lab load-test
Fig. 2.2Beam under factored load
Testing Ru at the factored load level validates the LRFD inequality.
§2.6.3
Snow overload
Fig. 2.3Roof collapse under snow
1.2D + 1.6S envelope missed — collapse.
§2.6.4
Wind uplift
Fig. 2.4Roof torn off in hurricane
0.9D + 1.0W uplift ignored.
10
Worked examples
Full textbook solutions — problem, theory, step-by-step, verification, interpretation
Example 2.1
Governing wu for a roof beam
Snow-controlled Combo 2 governs a cold-climate roof beam.
Problem statement
A roof beam carries D = 0.45 k/ft, Lr = 0.30 k/ft, and S = 0.60 k/ft (no L, W, E). Determine the governing wu per ASCE 7-22.
FIG. 2.1 — Roof beam under D + Lr + S; snow governs the envelope.DIMSimply-supported roof beam — dimensioned loads (D, Lr, S) and span; snow controls the envelope.
Given
D = 0.45 k/ft
Lr = 0.30 k/ft
S = 0.60 k/ft
L = W = E = 0
Find
Governing wu
Assumptions
Simply supported roof beam
Snow > roof live
Code references
ASCE 7-22 §2.3.1
Theory & approach
Run every applicable combo; envelope Ru. For gravity-only, Combos 1–3 usually control.
Step-by-step solution
1
Combo 1
FormulaASCE 7 §2.3.1
1.4 D
1.4·0.45 = 0.63 k/ft
2
Combo 2
Formula
1.2 D + 1.6·max(Lr, S, R) + 0.5·L
1.2·0.45 + 1.6·0.60 + 0 = 0.54 + 0.96 = 1.50 k/ft
3
Combo 3
Formula
1.2 D + 1.6·max(Lr,S,R) + 0.5 W
1.2·0.45 + 1.6·0.60 + 0 = 1.50 k/ft
4
Envelope
wu = max(0.63, 1.50, 1.50) = 1.50 k/ft
Verification
Combo 2 with snow is expected to govern in a cold-climate roof — matches intuition.
Final answer
wu = 1.50 k/ft (Combo 2, snow-controlled).
Common mistakes
Using Lr and S together — take the max, not the sum.
Skipping Combo 1 when D is small.
References
· ASCE 7-22 §2.3.1
11
Guided practice
Compute the governing variables — hints unlock as you need them
A column has service axial forces PD = 200 k (dead), PL = 120 k (live), PW = ±80 k (wind, ± means either sign). Screen the ASCE 7 / AISC LRFD combinations and report (a) the governing compression P_u and (b) the net axial force under wind uplift.
Your turn
Hints
1.List all seven LRFD combinations (AISC 360 §B2 / ASCE 7 §2.3.1) before you plug in numbers.
12
Independent practice
Solve the chapter's design task — compute each governing variable
Design task
An interior floor beam supports a tributary width of 8 ft over a simple span of 24 ft. Compute the factored uniform load, factored moment, and factored shear.
For a simply supported UDL: Mu = wu·L²/8, Vu = wu·L/2.
Submit your answer
13
Mini design challenge
Pick the LRFD combination that governs — compression and uplift are separate winners
Brief
Screen ALL seven LRFD combinations for a 3-story column: PD = 320 k, PL = 180 k, PLr = 25 k (roof live), PW = ±90 k, PE = ±60 k (seismic). Identify the governing compression demand AND check for net uplift — this is the outcome for Chapter 2 (loads and combinations).
These questions reference AISC Steel Construction Manual (16th ed.) — sections, equations, and tables are cited explicitly. Use a calculator. Each question offers a clue you may reveal before answering. Submissions are recorded to your account once signed in.
C2-01ASCE 7-22 §2.3.1
1. At a section: D=40, L=60, Lr=15, W=25, E=30 kips. Which LRFD combo controls (max compression)?
C2-02ASCE 7-22 §2.3.1 combo 6
2. For a member with D=20, W=−15 k (uplift possible), check net uplift via which combo?
C2-03ASCE 7-22 Eq. 4.7-1
3. Live load reduction (ASCE 7 §4.7.2) for KLL·AT = 800 ft², Lo = 50 psf:
C2-04ASCE 7-22 §4.7.3
4. Which condition disallows any live-load reduction per ASCE 7?
C2-05AISC 360-22 §D2
5. φ (resistance factor) for tensile yielding on gross section is:
C2-06ASCE 7-22 §2.3.1
6. For an OFFICE floor with D=80 psf, L=50 psf, tributary width 10 ft: factored w (k/ft) using 1.2D+1.6L:
8. An interior column PD=200, PL=140, PLr=15, PW=±80, PE=60 k. Max Pu?
C2-09ASCE 7-22 §4.8
9. For roof live load Lr on a tributary area >600 ft², AT=800, Lo=20 psf, F1 (slope)=1: Lr =?
C2-10ASCE 7-22 §2.3.6
10. The load factor on E in the seismic combo (Combo 6) is:
C2-11AISC 360-22 §D2(b)
11. φRn for tensile rupture on effective net section uses φ =:
C2-12AISC 360-22 Commentary B3
12. In LRFD, the target reliability index β for typical gravity members is approximately:
C2-13ASCE 7-22 §2.3.1
13. For a member D=25, L=0, W=+40 k, find controlling Pu:
C2-14ASCE 7-22 §4.7
14. Office floor plan: 30 ft × 30 ft bays, infill beams at s = 10 ft on center, span L = 30 ft. For the interior beam B2, what is the tributary area AT used for live-load reduction?
C2-15ASCE 7-22 Eq. 4.7-1
15. Same beam, Lo = 50 psf. Compute the reduced live load L per ASCE 7 Eq. 4.7-1 with KLL·AT = 600 ft².
Attach your handwritten or typed step-by-step solution for this chapter's graded quiz. The instructor can download every submission. PDF only, up to 25 MB.
How your upload will be graded
Your file — PDF, Word document, scanned handwriting or a photo — is read page by page like an experienced structural engineering instructor would. The scan is validated first, then your reasoning, structural model, calculations, diagrams, code basis and final answers are graded on process, not just the final number. Design work is additionally reviewed against AISC 360-22 and ACI 318-19. Partial credit applies, and one early mistake carried correctly forward is only penalized once.
Before you attach the file
Include every page, in order and right way up — a missing page cannot earn credit.
Keep margins in frame: nothing cropped at the edges, especially boxed final answers.
Scan or photograph in good, even light — no shadows, glare or blur; 300 dpi or a steady phone scan.
Write in dark pen; faint pencil is the most common 'UNREADABLE — INSTRUCTOR REVIEW REQUIRED' flag.
Include all diagrams, FBDs, shear/moment diagrams and section sketches — label them.
Number each question the same way the assignment does, and note anything you skipped.
Show units on every line and box your final answers.
Combine everything into ONE file (PDF preferred; Word, JPG or PNG accepted) under 20 MB.
Sign in to upload your worked solution.
16
FE exam preparation
NCEES-style practice with timer, equation sheet, and mastery tracking
Q1 — Structural steel braced-frame column base anchors. Service axial loads: D = 45 k (compression), Lr = 15 k (compression), W = ±75 k (overturning). Per ASCE 7-22 basic LRFD combinations, determine the maximum governing design tensile (uplift) force Pu the anchor bolts must resist.
 Objective 01